NDVI Change Detection tutorial
![]()
The service first performs a co-registration of a pair optical calibrated datasets acquired before and after an event. Then, it derives a binary change mask from the NDVI difference by using a threshold and a spatial filter. The output is a binary map representing the NDVI loss, given in raster and vector formats. The input datasets may come from different optical sensors.
 NDVI-CD service description and specifications are available in this section.
Select the processing service
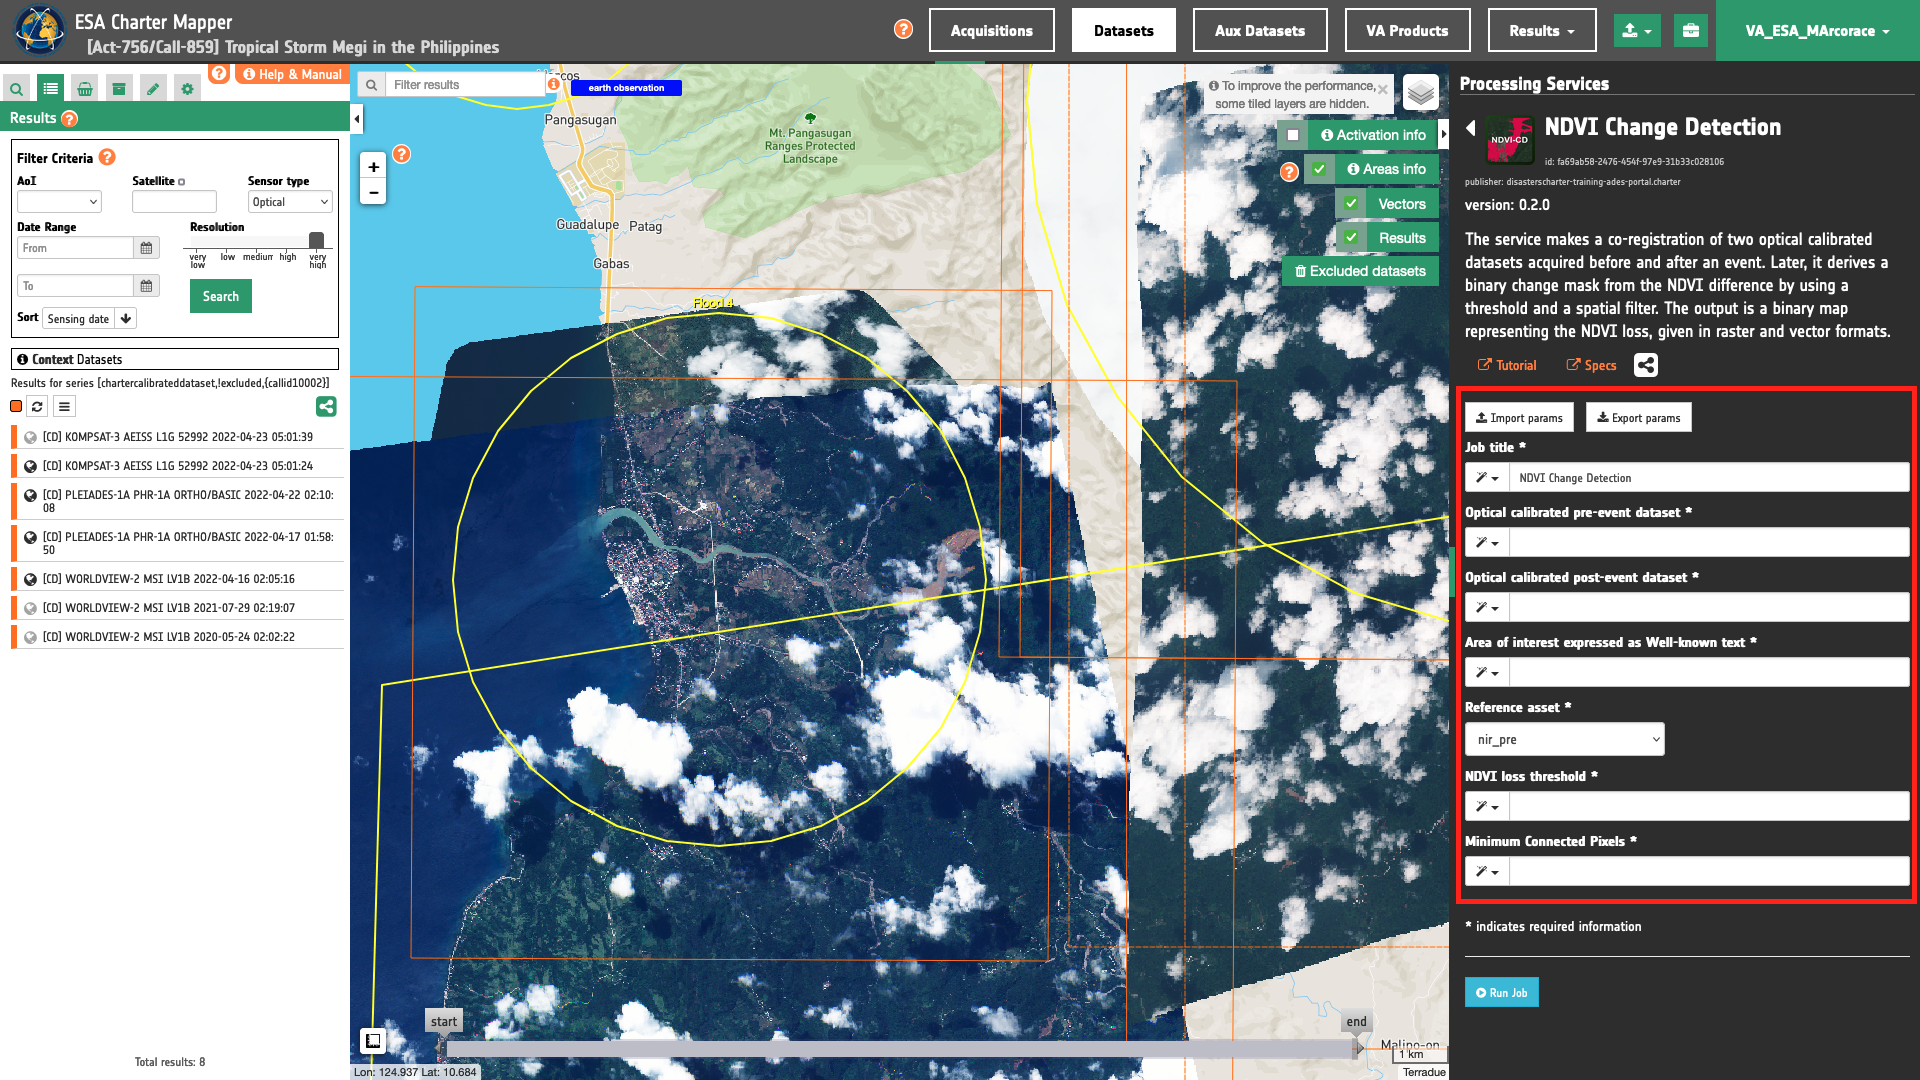
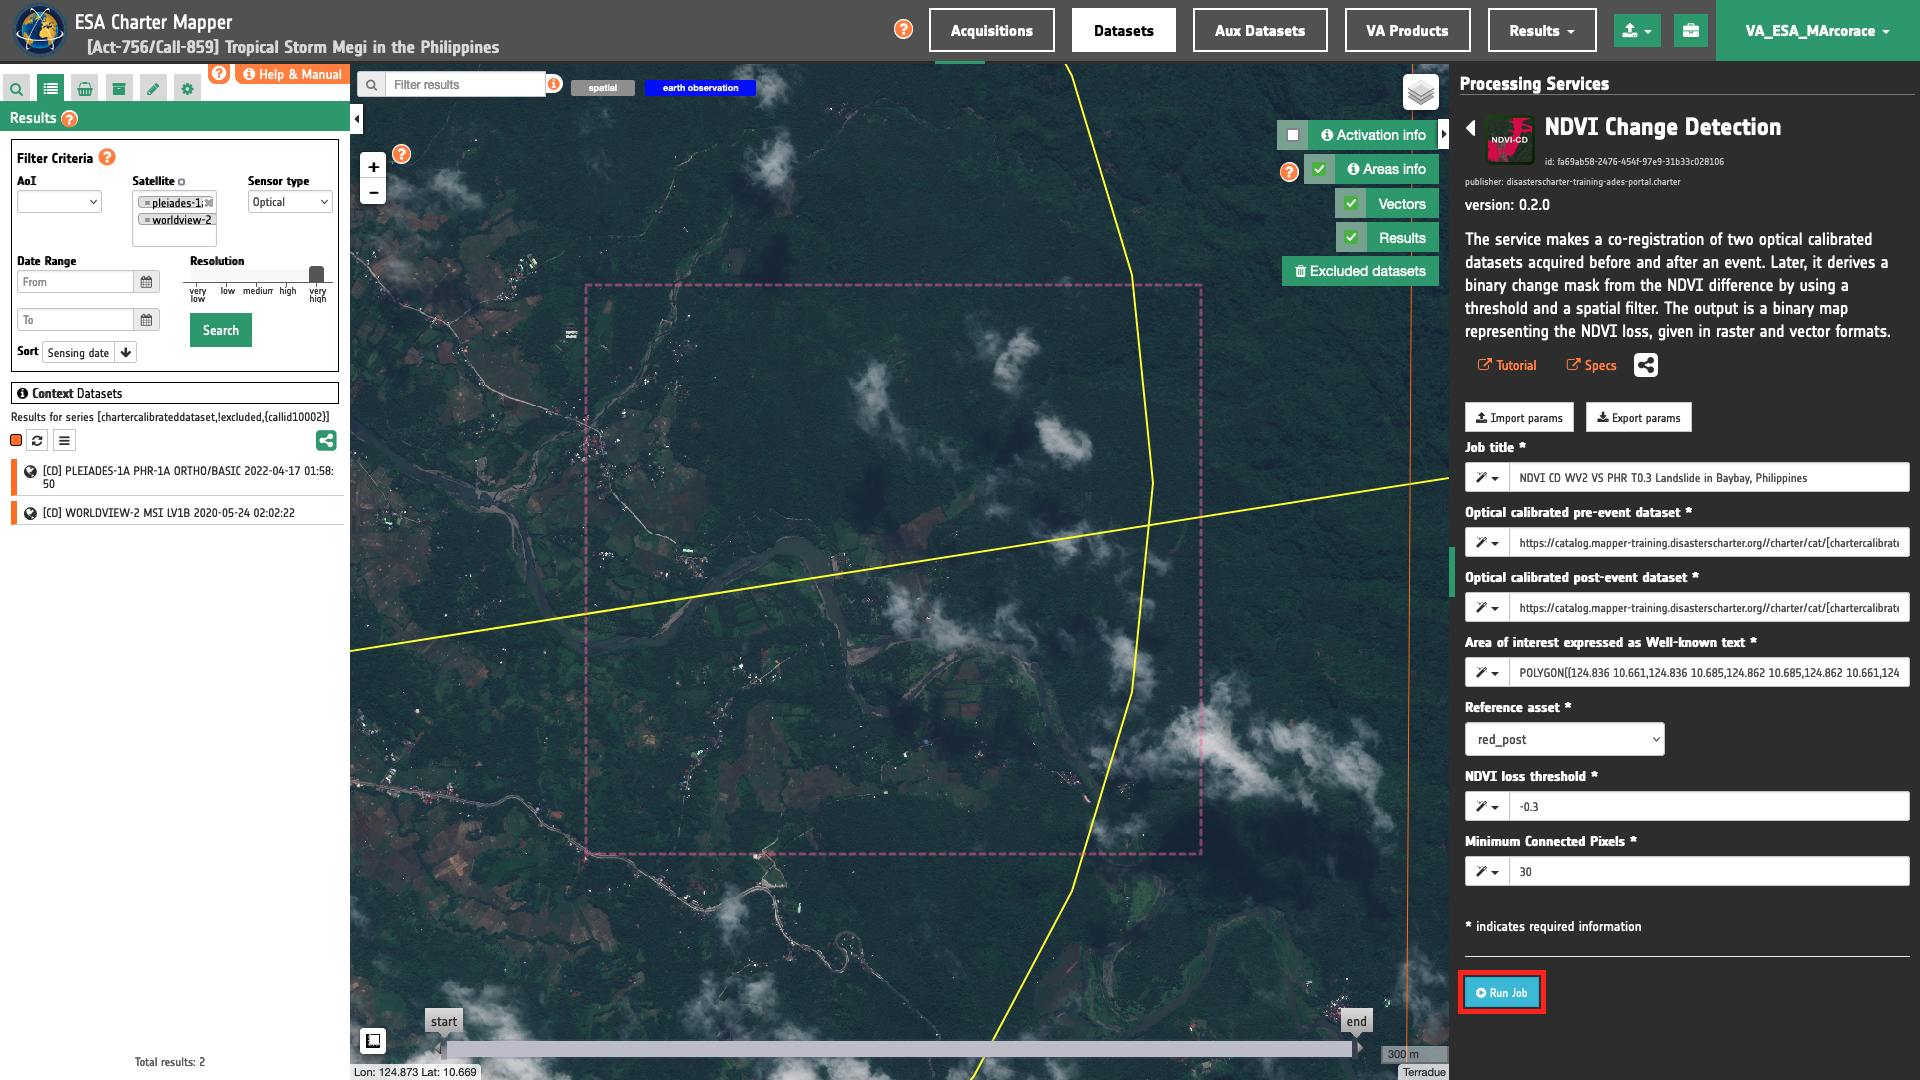
After the opening of the activation workspace, in the right panel of the interface, open the Processing Services tab. Select the processing service NDVI Change Detection (NDVI-CD).
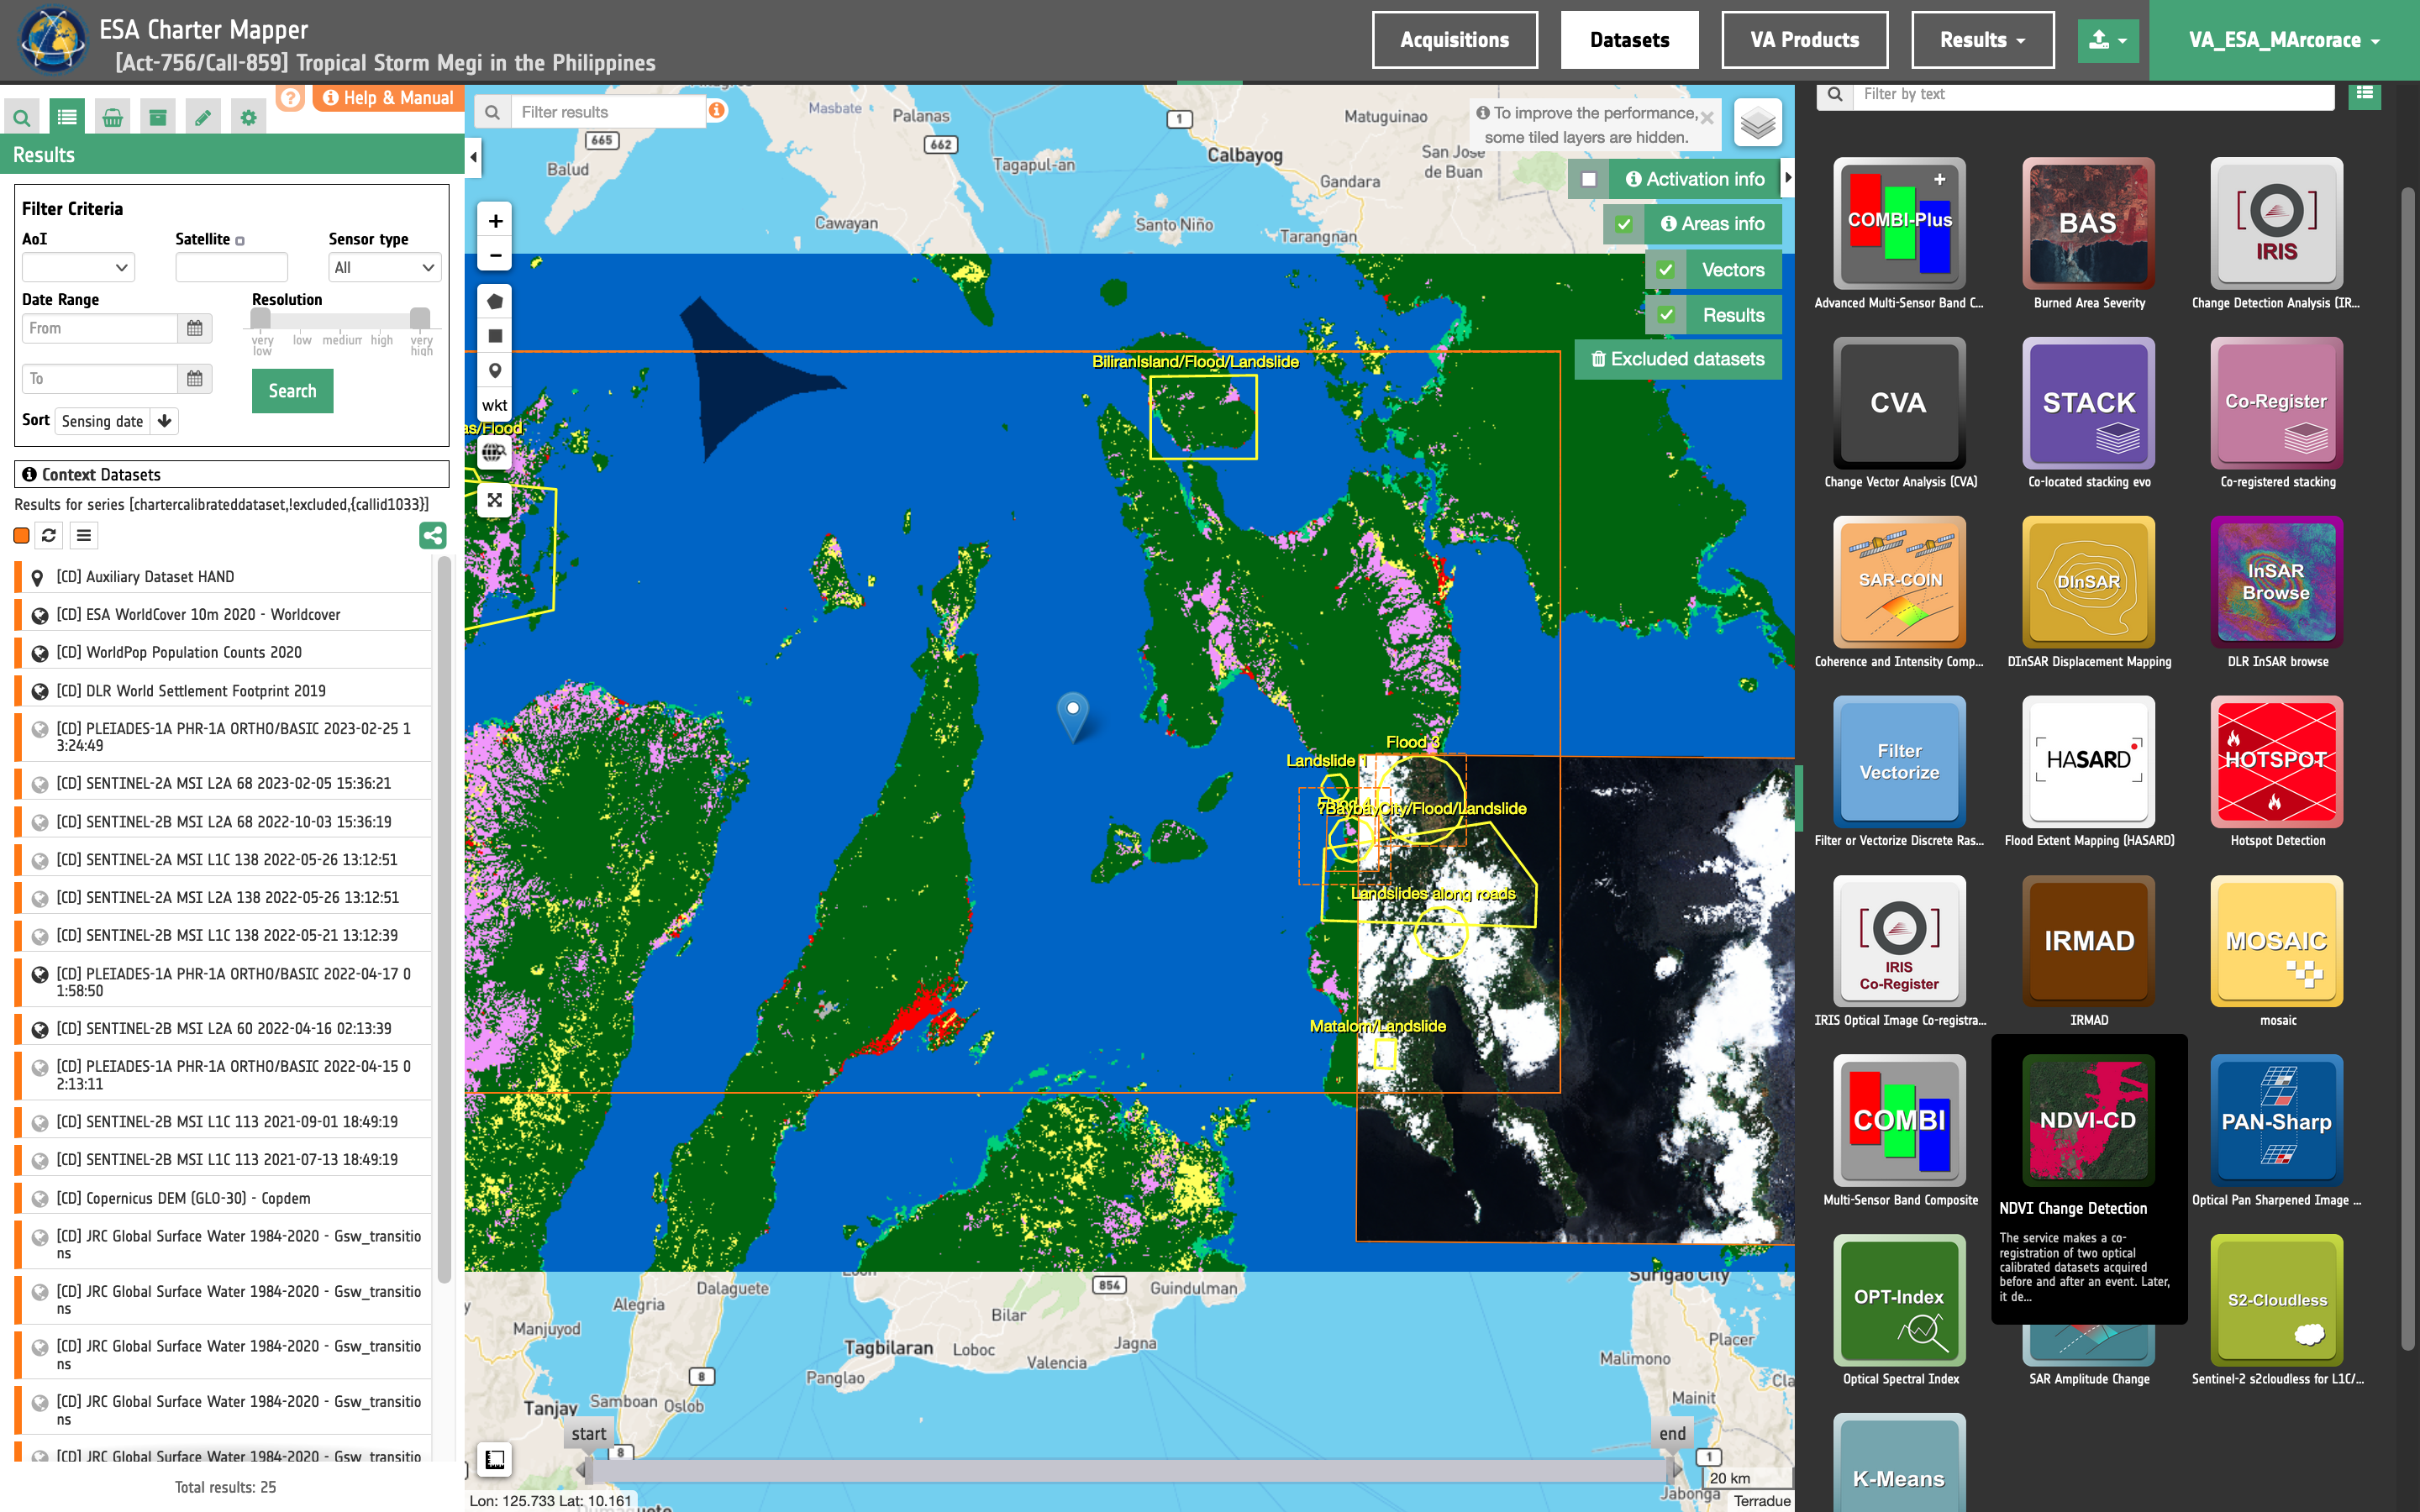
The "NDVI Change Detection (NDVI-CD)" panel is displayed with parameters values to be filled-in.
Find the data using multiple filter criterias
Select the area for which you want to do an analysis, e.g over Baybay, Philippines.
From the Navigation and Search toolbar (located in the upper left side of the map), click on Spatial Filter and draw a square AOI over Baybay area in the Philippines. This spatial filter allows you to select only the EO data acquired over this area.
From the top of the left panel, use Filter Criterias to search for a pair of VHR Optical Calibrated Datasets. Select from the list of options available Optical Under Sensor Type filter, and worldview-2 and pleiades under the Satellite filter.
Now it is possible to choose a pair of pre- and post-event reflectance images from Optical Calibrated Datasets to be used for the NDVI loss estimation. As an example you can choose the following pair:
-
Pre-event [CD]: WORLDVIEW-2 MSI LV1B 2020-05-24 02:02:22
-
Post-event [CD]: PLEIADES-1A PHR-1A ORTHO/BASIC 2022-04-17 01:58:50
Fill the parameters
After the definition of spatial and time filters, you can employ NDVI-CD, by using a this pair of Calibrated Datasets.
To do so you can fill the parameters as described in the following sections.
Job name
- Insert as job name:
NDVI CD WV2 VS PHR T0.3 Landslide in Baybay, Philippines
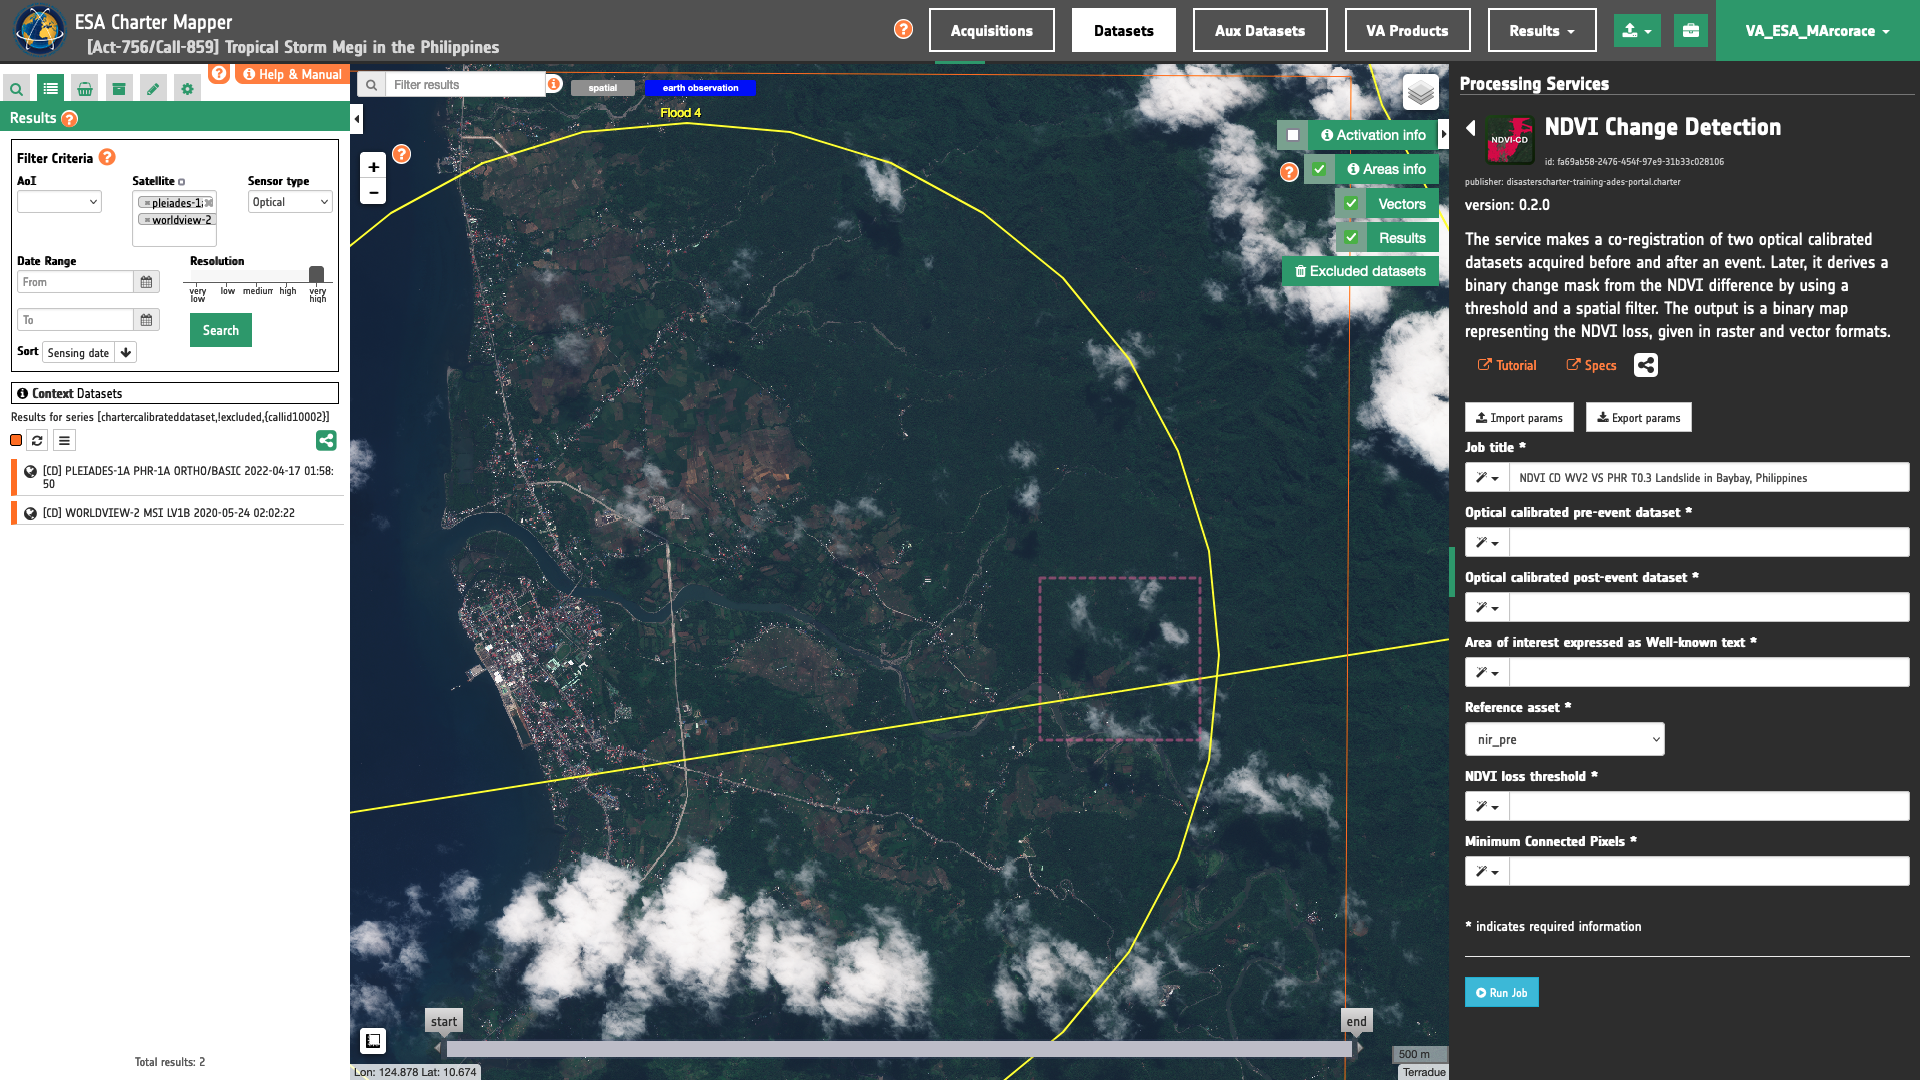
Input pair of calibrated datasets
The first two mandatory parameters are Optical pre-event calibrated dataset and Optical post-event calibrated dataset fields.
Drag and Drop the selected items:
-
Optical calibrated pre-event dataset
-
Optical calibrated post-event dataset
in the Optical pre-event calibrated dataset and the Optical post-event calibrated dataset fields respectively.
Warning
Drag and drop the Dataset (e.g. "[CD] WORLDVIEW-2 MSI LV1B 2020-05-24 02:02:22") and not the single-band asset (e.g. "red") into Optical pre-event calibrated acquisition or Optical post-event calibrated dataset fields.
Area of interest expressed as Well-known text
In the third parameter the user must define the “Area of interest as Well Known Text”. The AOI can be defined by using the drawn polygon defined with the area filter.
Tip
In the definition of “Area of interest as Well Known Text” it is possible to apply as AOI the drawn polygon defined with the area filter. To do so, click on the button in the left side of the "Area of interest expressed as Well-known text" box and select the option AOI from the list. The platform will automatically fill the parameter value with the rectangular bounding box taken the from current search area in WKT format.
Reference asset
In the fourth parameter the user must define which asset shall be considered as reference in the co-registration. Options are: red_pre, red_post, nir_pre and nir_post.
Being the post-event dataset orthorectified and vegetation changes more sensitive to changes in the NIR, select red_post as reference single band asset.
NDVI threshold
Insert a negative decimal value (e.g. -0.3) to be used for the binarization of NDVI difference.
Tip
In general, rocks and bare soil have an NDVI equal or lower than 0.1 while dense vegetation (e.g. temperate forest) has NDVI of about 0.6. Thus, a loss of vegetation after a landslide (e.g. debris flow) could be roughly estimated by looking at areas showing a medium-high decrease in NDVI of about NDVI_diff = 0.1 - 0.6 = -0.5.
Filter threshold
Insert a threshold size in pixels to be used in the Sieve Spatial Filtering. As an example 30 means filtering clusters of pixels having size up to 30 pixels.
Warning
Threshold value shall be a positive integer number equal or higher than 30.
Tip
To estimate major changes and/or for a quick estimation of NDVI loss employ a medium 50 or high 100 filtering threshold. The vectorization of a medium-high filtered binary raster will be much faster.
Run the job
Click on the button Run Job and see the Running Job. You can monitor job progress through the progress bar.
Results: download and visualization
Once the job is completed, click on the button Show results at the bottom of the processing service panel.
Tip
You can also save the parameters employed in this job by clicking on the Export params button in the right panel. This allows you to copy all your entries to the clipboard. This is meant to be used for a quick re-submission of a similar job after a fine tuning of the parameters (e.g. to add a color formula later).
Below is reported the syntax which includes all the parameters employed in this example.
{
   "input_dataset_pre": "https://catalog.mapper-training.disasterscharter.org//charter/cat/[chartercalibrateddataset,!excluded,{callid10002}]/search?format=json&uid=call10002_WV02N10_679722E124_8037502020052400000000MS00-calibrated",
   "input_dataset_post": "https://catalog.mapper-training.disasterscharter.org//charter/cat/[chartercalibrateddataset,!excluded,{callid10002}]/search?format=json&uid=call10002_DS_PHR1A_202204170158146_FR1_PX_E124N10_1019_00936-calibrated",
   "aoi": "POLYGON((124.836 10.661,124.836 10.685,124.862 10.685,124.862 10.661,124.836 10.661))",
   "reference_asset": "red_post",
   "NDVI_loss_threshold": "-0.3",
   "minimum_connected_pixels": "30"
}
Visualization
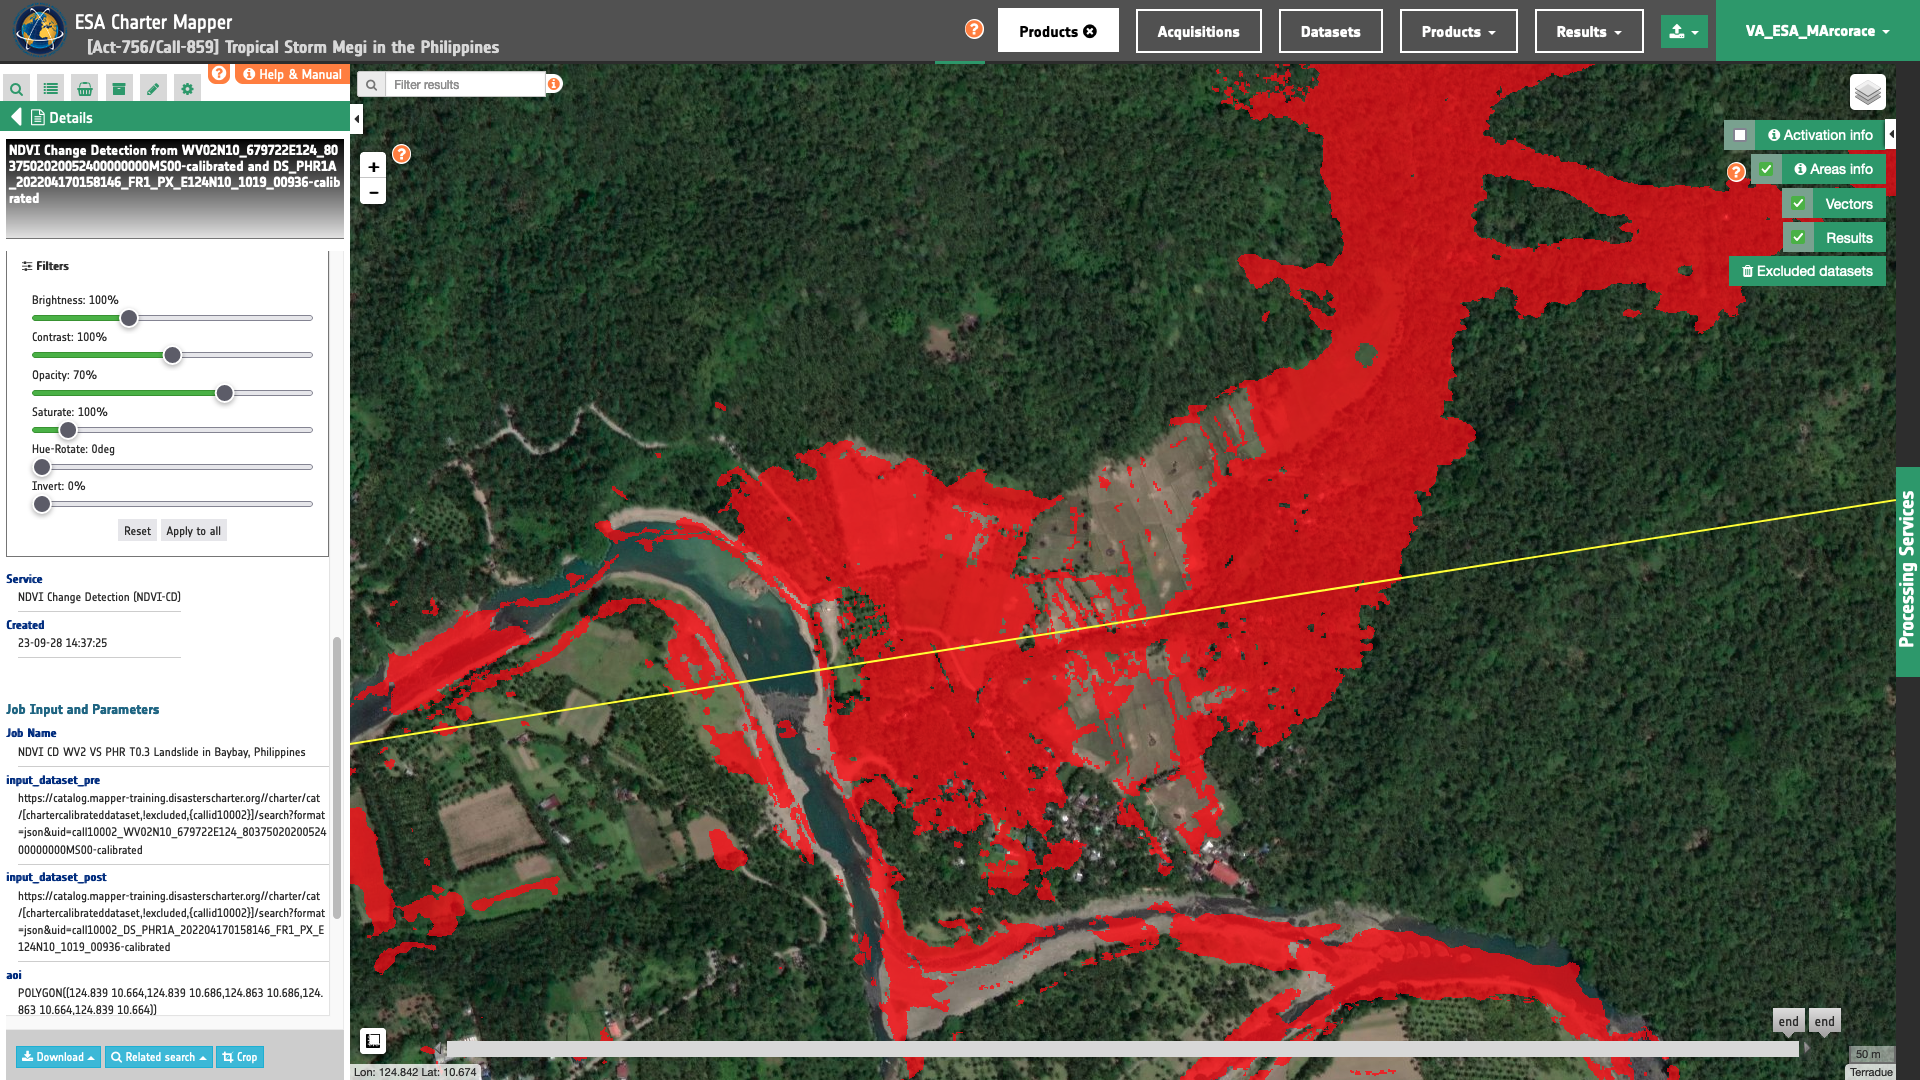
See the result on the map. The preview appears within the area defined in the spatial filter.
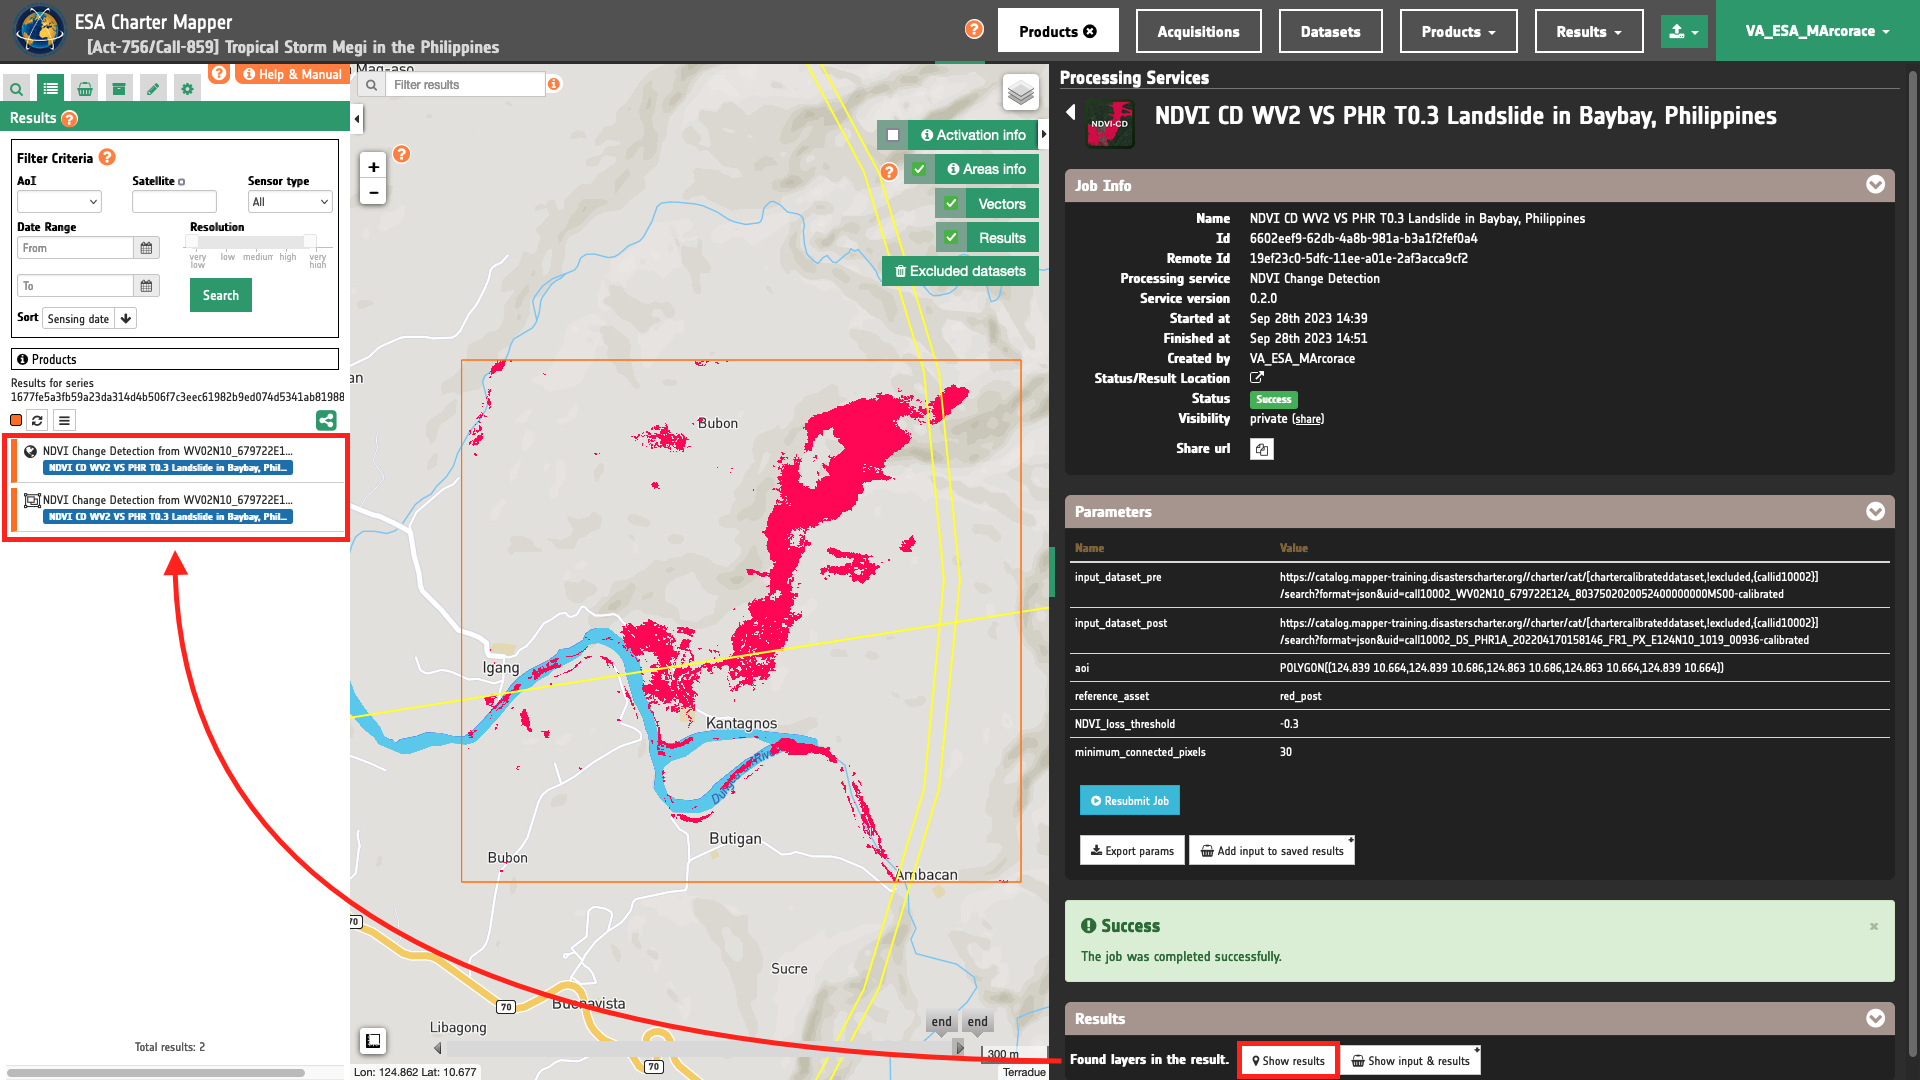
In red the overview-ndvi-change-filtered asset is showning the loss of vegetation due to landslide.
To get more information about the product just click on the preview in the map, a bubble showing the name of the layer NDVI Change Detection from WV02N10_679722E124_8037502020052400000000MS00-calibrated and DS_PHR1A_202204170158146_FR1_PX_E124N10_1019_00936-calibrated will appear and then click on the Show details button.
Tip
To quickly access Product Details double click on the layer from the Results list.
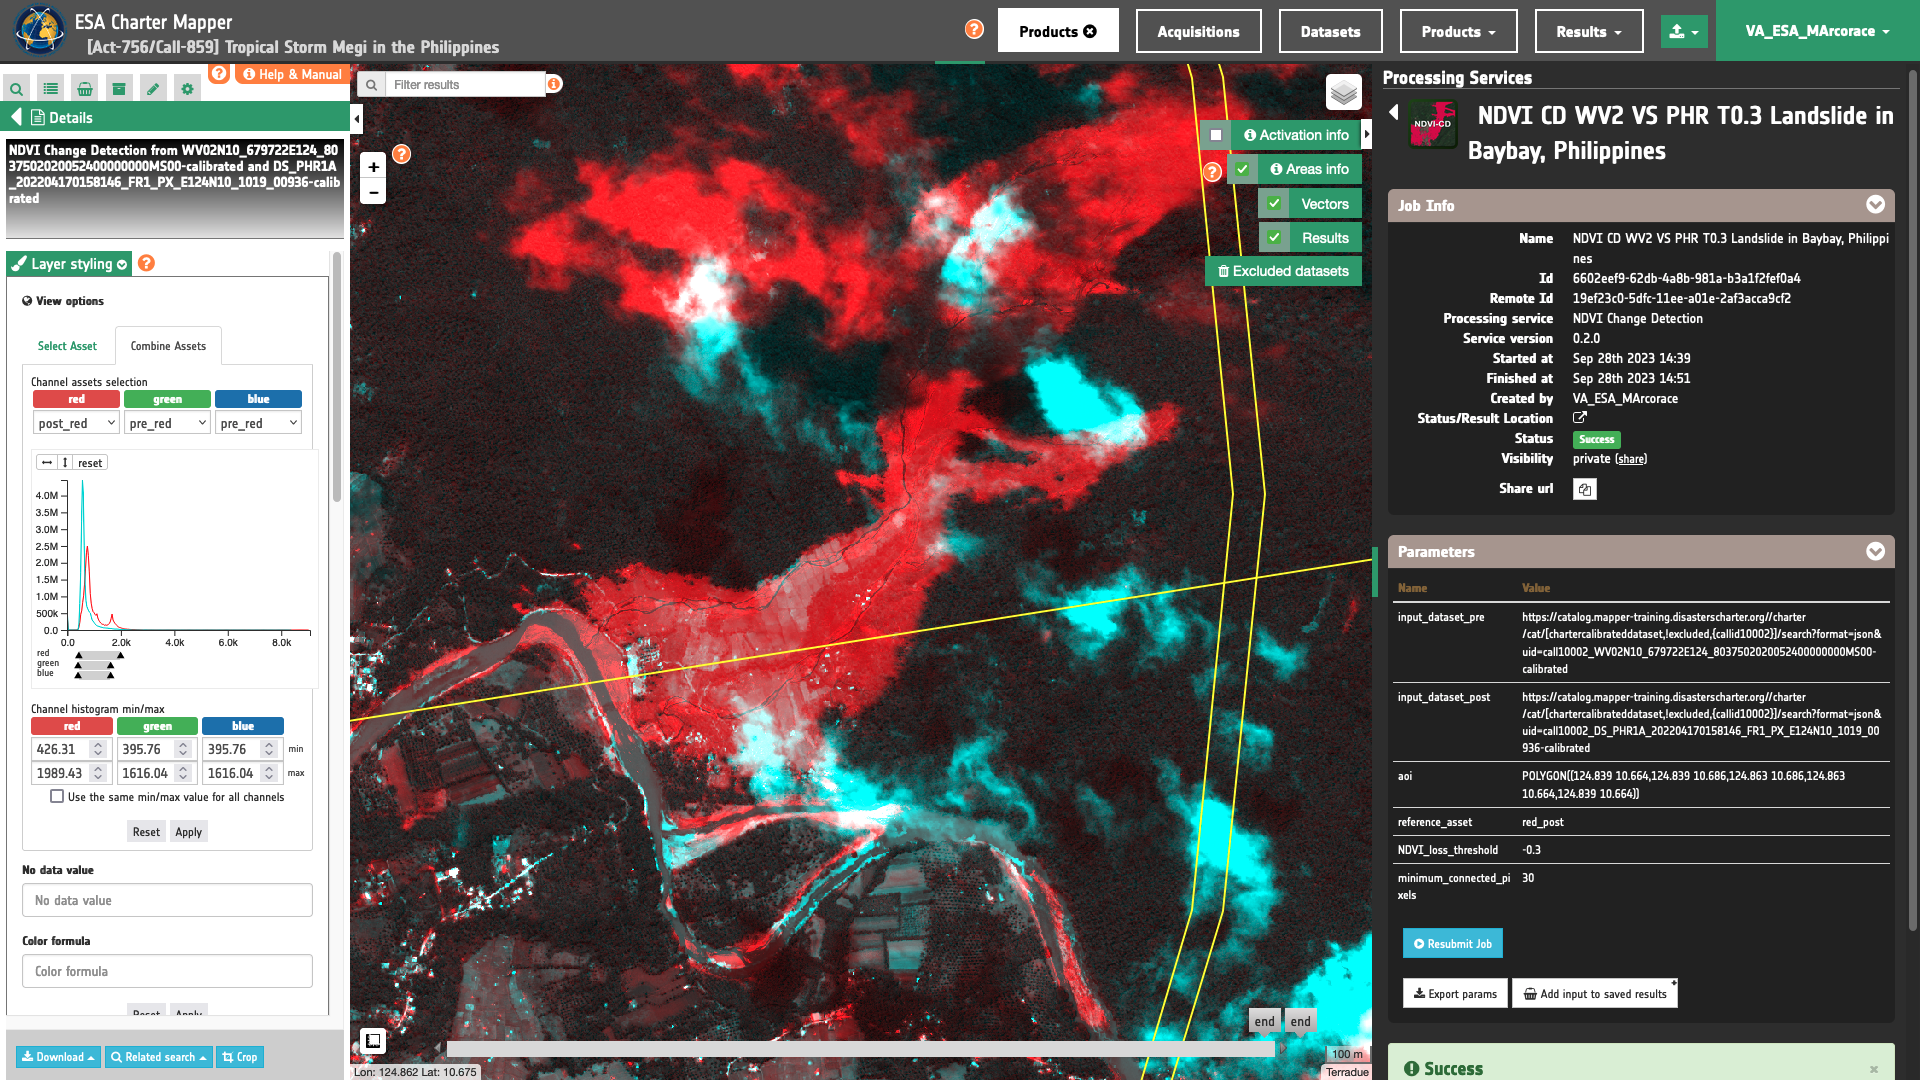
In the left panel of the interface, the details of Job Result will appear with Product metadata. Furthermore by clicking on Layer styling you can also access to the View options. Under Select Asset it is possible to select each asset and visualize it on the map. In here it is possible to see histogram/s of the Product which is visible in the map, set color formula, change Filters (e.g. Brightness, Opacity).
Tip
To visually compare the product overview with the underlying base layer (e.g. Natural Earth or Dark map) you can set the Opacity filter under View options as 70%.
In the left panel under the result Details is possible to create customized overview on the fly by clicking on Layer Styling and Combine Assets. As an example under Combine Assets you can create on the fly a Red-Cyan band composite by setting the post_red single-band asset in the RED channel, and the co-registered pre_red one in the GREEN and BLUE channels. This Red-Cyan band composite highlights reflectance changes in the red derived from the co-registered pair of Worldview-2 and Pleiades calibrated MS data.
Download
In this use case the NDVI Change Detection (NDVI-CD) service produces the following files:
- pre_red: co-registered single-band reflectance asset
redproduct from pre-event calibrated dataset as single band raster in COG format, - pre_nir08: co-registered single-band reflectance asset
nir08product from pre-event calibrated dataset as single band raster in COG format, - post_red: co-registered single-band reflectance asset
redproduct from post-event calibrated dataset as single band raster in COG format, - post_nir: co-registered single-band reflectance asset
nirproduct from post-event calibrated dataset as single band raster in COG format, - ndvi_change: single band binary mask from the binarization of NDVI difference (NDVI_post - NDVI_pre) as single band raster in COG format,
- ndvi-change-filtered: single band binary mask from the binarization of NDVI difference (NDVI_post - NDVI_pre) after a spatial filtering as single band raster in COG format,
- overview-ndvi-cd-filtered: NDVI change overview (NDVI loss is shown in red) as multi-band raster in COG format,
- ndvi-change-vectorized: polygon vector derived from the vectorization of
ndvi-change-filteredsingle band for DN=1 given in GeoJSON and FlatGeoBuf formats.
These products can be downloaded by clicking on the Download button located at the bottom of the Product Details tab in the left panel.