FilterVectorize tutorial
![]()
This service provides the option to Filter and/or Vectorize a discrete raster asset. Spatial filtering of the input raster asset is based on the Sieve algorithm, which removes clusters of pixels smaller than a given threshold. Vectorize creates vector polygons for all connected regions of pixels in the raster asset sharing a common pixel value. The service allows the user to select the discrete raster values to be polygonised. The output is a single band asset representing the filtered raster, and if applicable, the converted polygon vector.
 FilterVectorize service description and specifications are available in this section.
Note
This service can be used only with classified rasters (with a limited number of pixel values).
Use case 1: vectorize binary mask from a change detection service
Abstract
This first use case explains how to vectorize a binary mask derived from a change detection service (e.g. IRIS or HASARD).
Warning
Avoid converting noisy or large rasters with Vectorize. When possible, subset your classified image into a smaller AOI or employ a sufficient spatial filtering on it. A conversion of a large or noisy raster may result into a very large vector file (tens or hundreds of Mb) which is difficult to be handled inside or outside the platform (e.g. in a GIS software).
Find and access a Result from other on-demand services
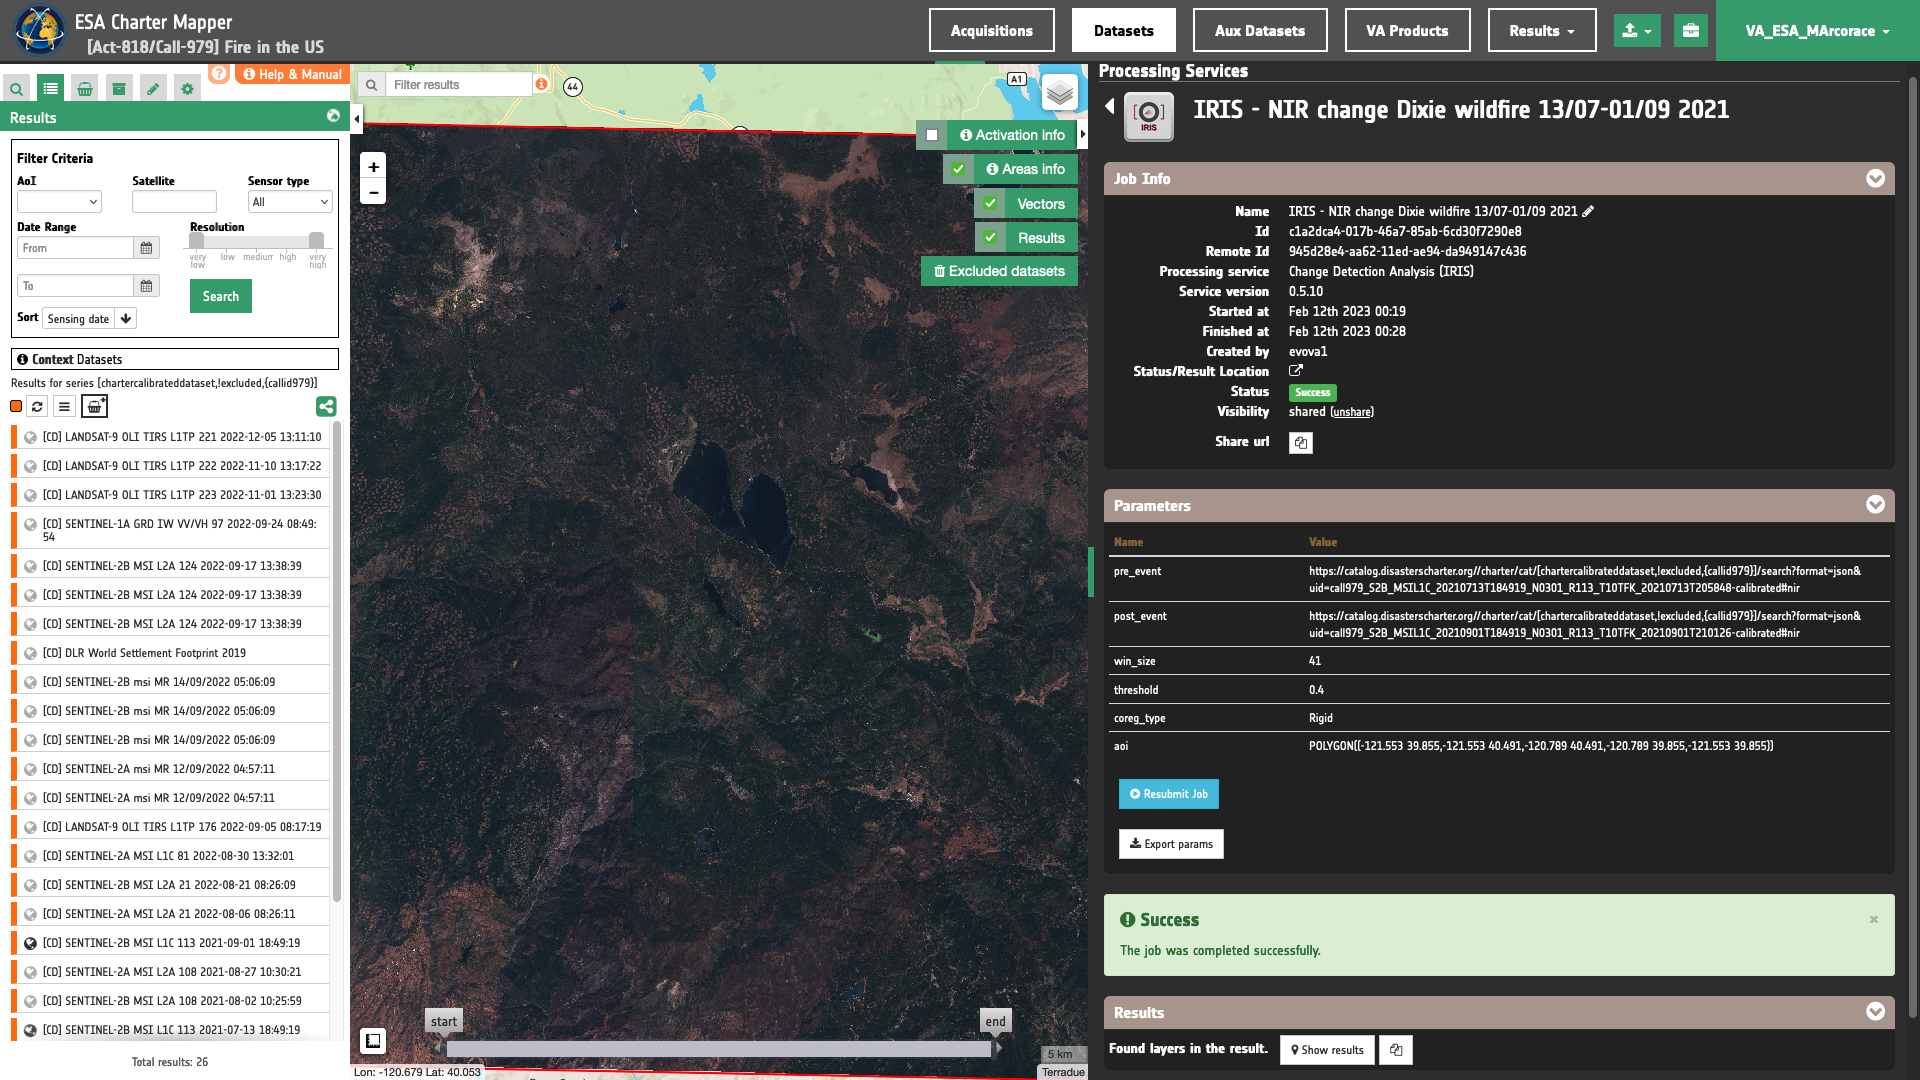
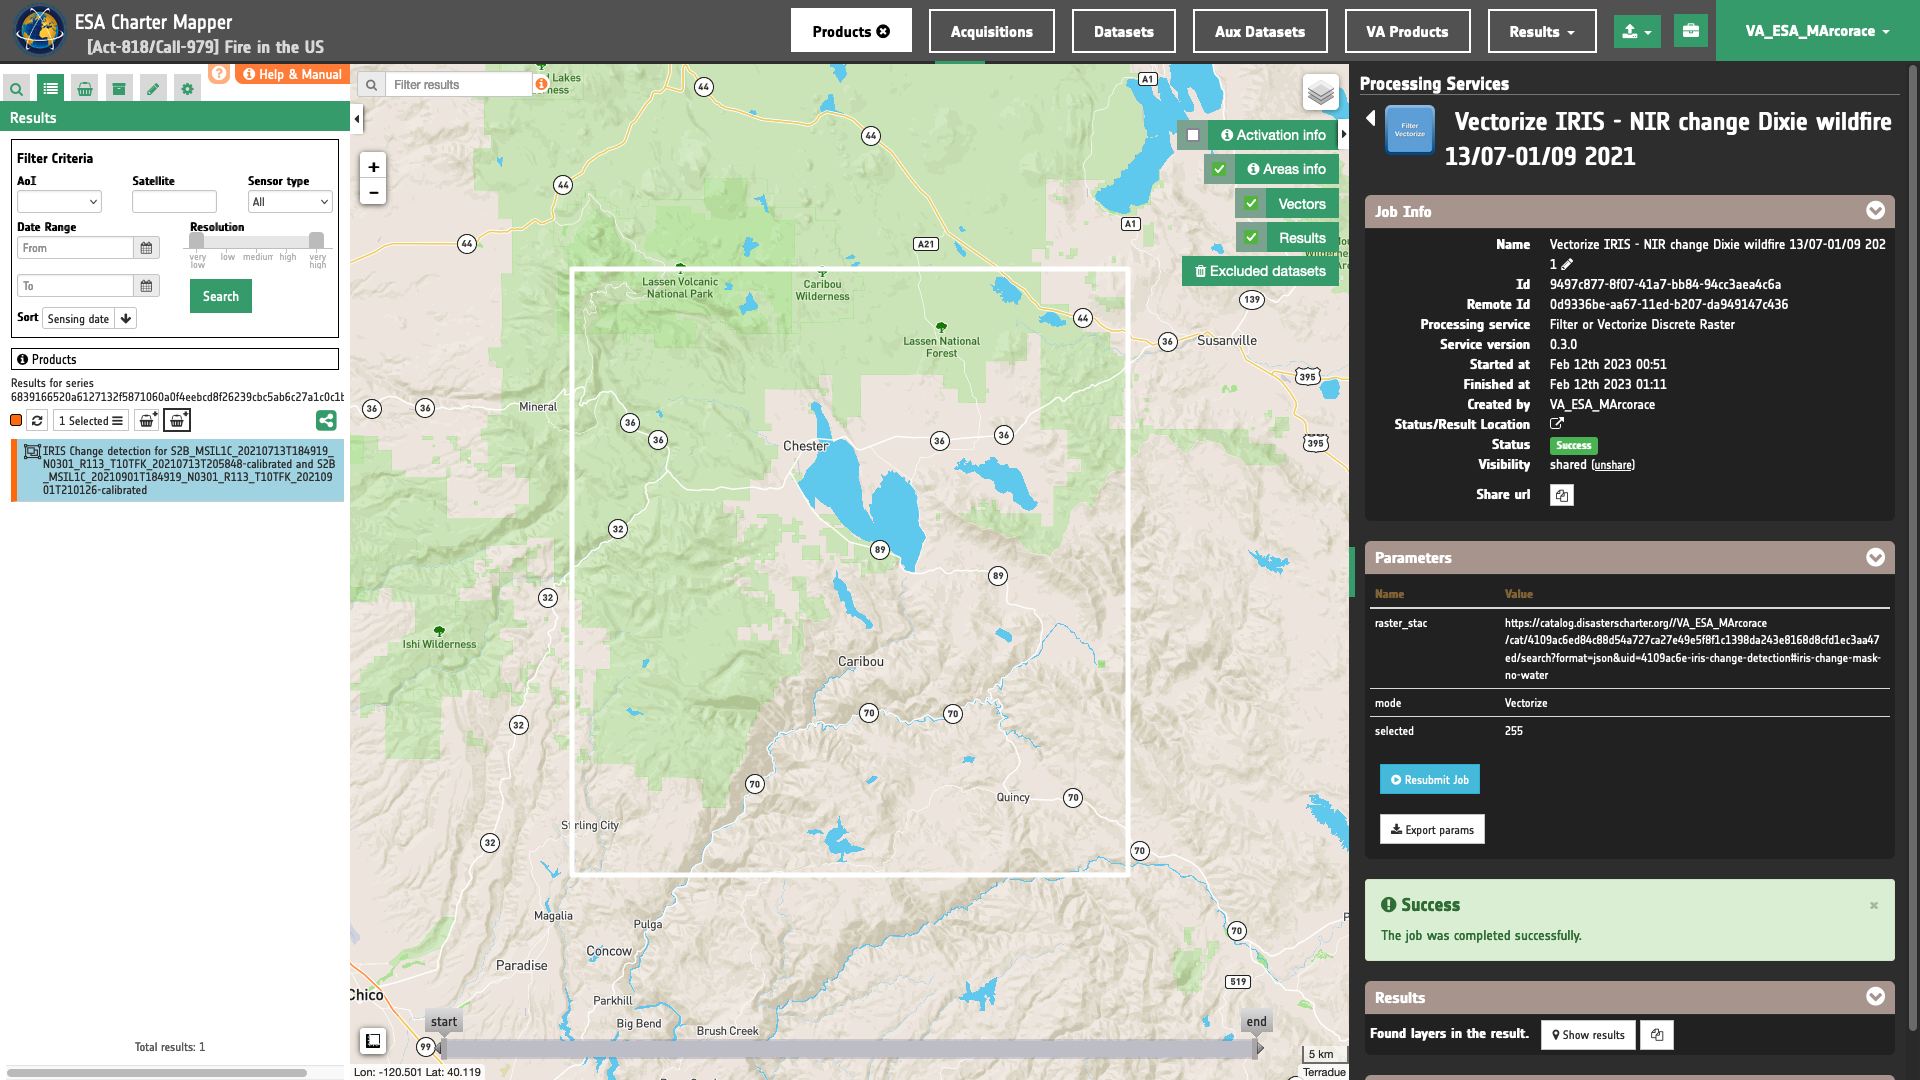
Select the area for which you want to do an analysis e.g. over Northern California in the US. In this use case a Result from the IRIS service is post-processed by the FilterVectorize service to obtain the vector of IRIS-based detected changes occurred during the Dixie Fire event of 2021.
Find a successful IRIS job from the Right Panel Processing Services under the Jobs tab and access to the Result in the left panel by clicking on the Show results button.
Tip
Same IRIS processing result can also be listed in the left panel under the Results tab by clicking on My results or Shared results under the Results data context.
In this example the IRIS Result derived from a pair of Sentinel-2 L1C Calibrated Datasets is:
IRIS - NIR change Dixie wildfire 13/07-01/09 2021

Fill the parameters
After the identification of the input IRIS Result, you can employ FilterVectorize in Vectorize mode, by using the binary mask of detected changes (iris-change-mask or iris-change-mask-no water single band asset) from the IRIS Result derived with Sentinel-2 data. To do so you can fill the parameters as described in the following sections.
Job name
Insert as job name:
Vectorize IRIS - NIR change Dixie wildfire 13/07-01/09 2021
Input discrete single-band raster
First mandatory parameter is the input product reference to a discrete single band asset from a Result of an on-demand service. This parameter is required to specify both the product reference to the Result and the discrete single band asset to be used in FilterVectorize.
Hint
To consult the single band assets contained in a Result just Click on the Show assets button available near the feature title. After the click a list with all single band assets included within the Result will appear under the feature title.
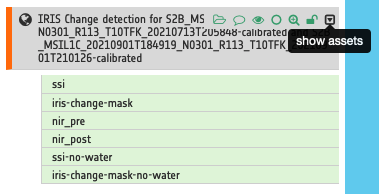
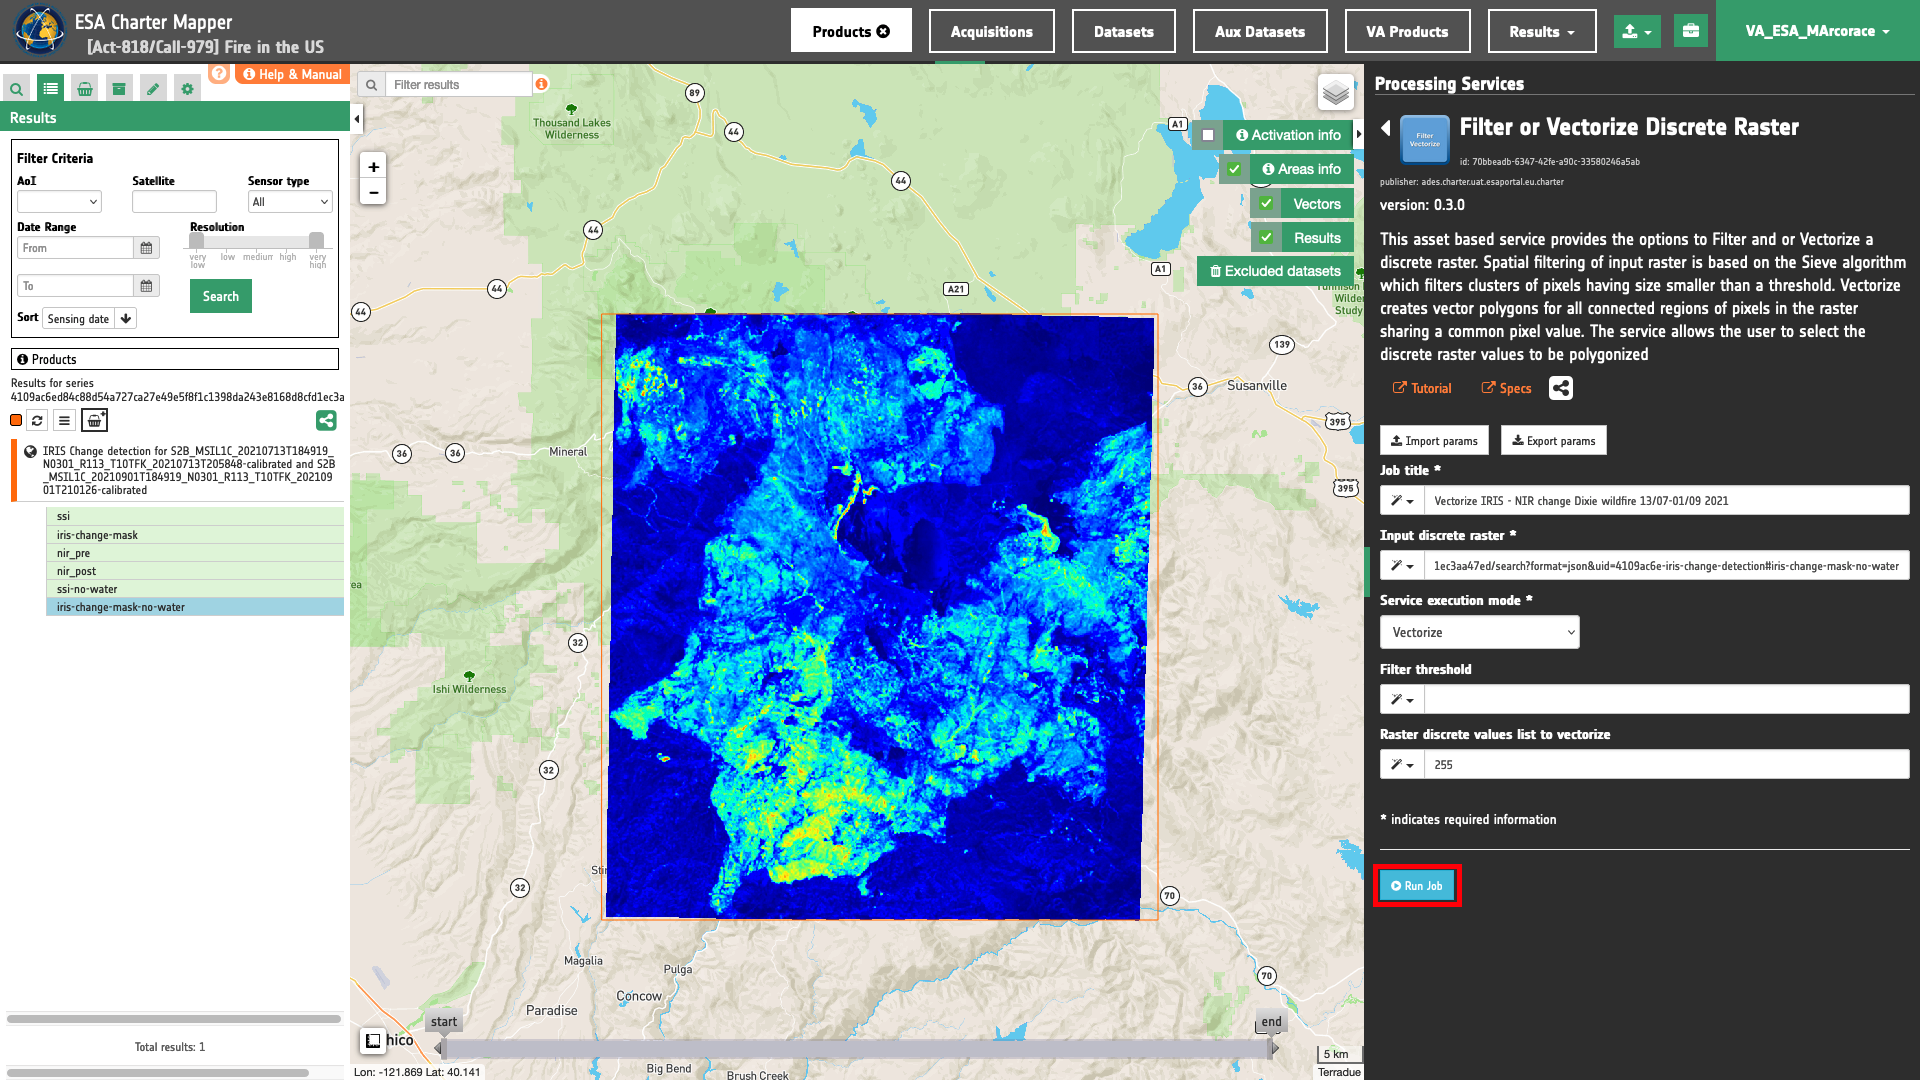
Thus, drag and Drop the single band asset iris-change-mask-no water in the Input discrete raster field.
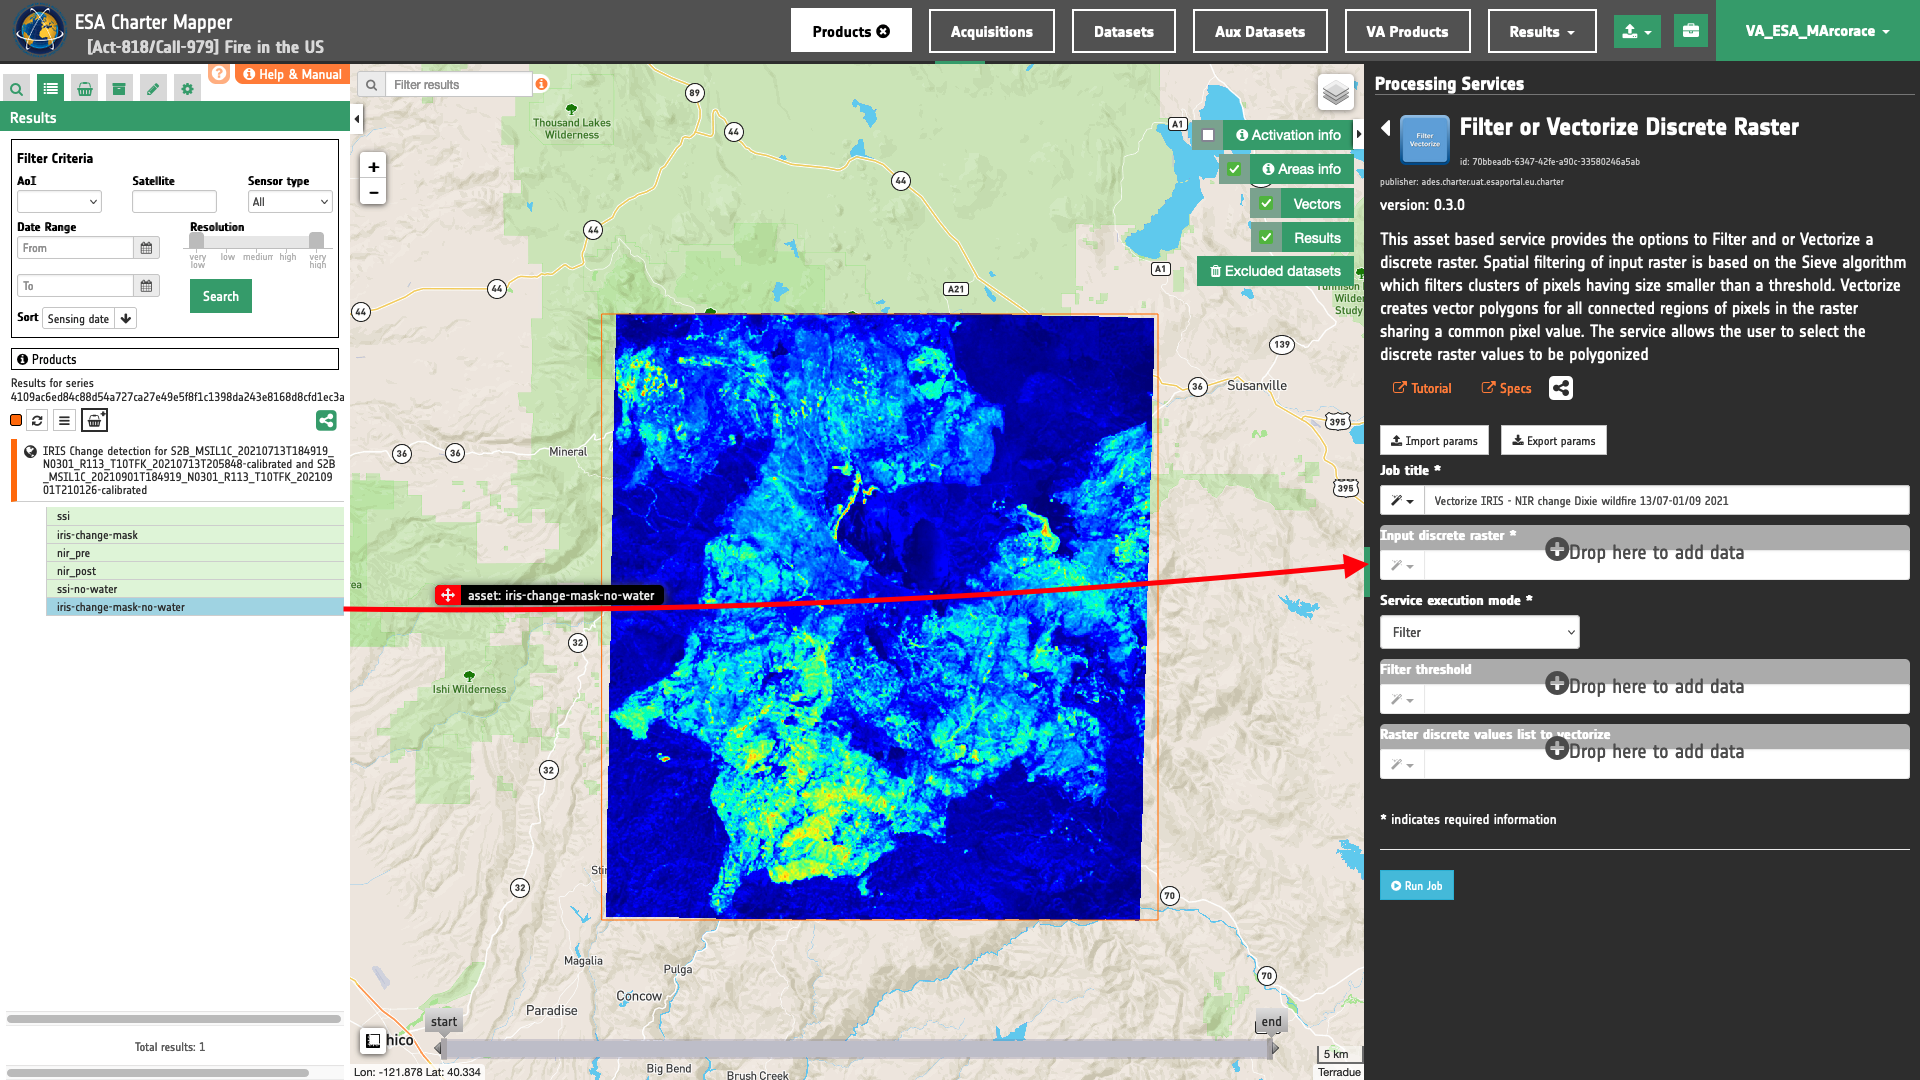
Service execution mode
Select the Vectorize mode from the list.
Filter Threshold
Leave it blank since no filtering is needed.
Note
This parameter is mandatory only for FilterVectorize executed in Filter or Filter and Vectorize modes.
Raster discrete values list to vectorize (optional)
In this last optional parameter the user can insert a single (e.g. 1) or a list (1,2) of DN values to vectorize. Inserted pixel value/s of input raster will be used when converting the iris-change-mask-no-water discrete raster into polygons.
Hint
Find here more details about the iris-change-mask or iris-change-mask-no-water asset from IRIS service.
Insert 255 to have only pixels representing detected changes converted to polygons.
Note
When this parameter is left blank in Vectorize or Filter and Vectorize modes, all DNs of input discrete rasters are converted to polygons.
Run the job
Click on the button Run Job and see the Running Job. You can monitor job progress through the progress bar.
Results: download and visualization
Once the job is completed, click on the Show results button located at the bottom of the processing service panel.

Below is reported the syntax which includes all the parameters employed in this example.
{
   "raster_stac": "https://catalog.disasterscharter.org//VA_ESA_MArcorace/cat/4109ac6ed84c88d54a727ca27e49e5f8f1c1398da243e8168d8cfd1ec3aa47ed/search?format=json&uid=4109ac6e-iris-change-detection#iris-change-mask-no-water",
   "mode": "Vectorize",
   "selected": "255"
}
Visualization
See the result on the map. A footprint of the discrete raster converted to vector appears in the map.
To get more information about the product just double click on the title of the vector feature listed in the left panel under the Result tab.
In the left panel of the interface, the details of Job Result will appear with Product metadata. Furthermore by clicking on Layer styling you can also access to the View options of the vector feature. Information about current zoom and minimum zoom level will appear in the left panel.
Warning
Until current zoom level is higher than the minimum the vector will not be visible in the map.
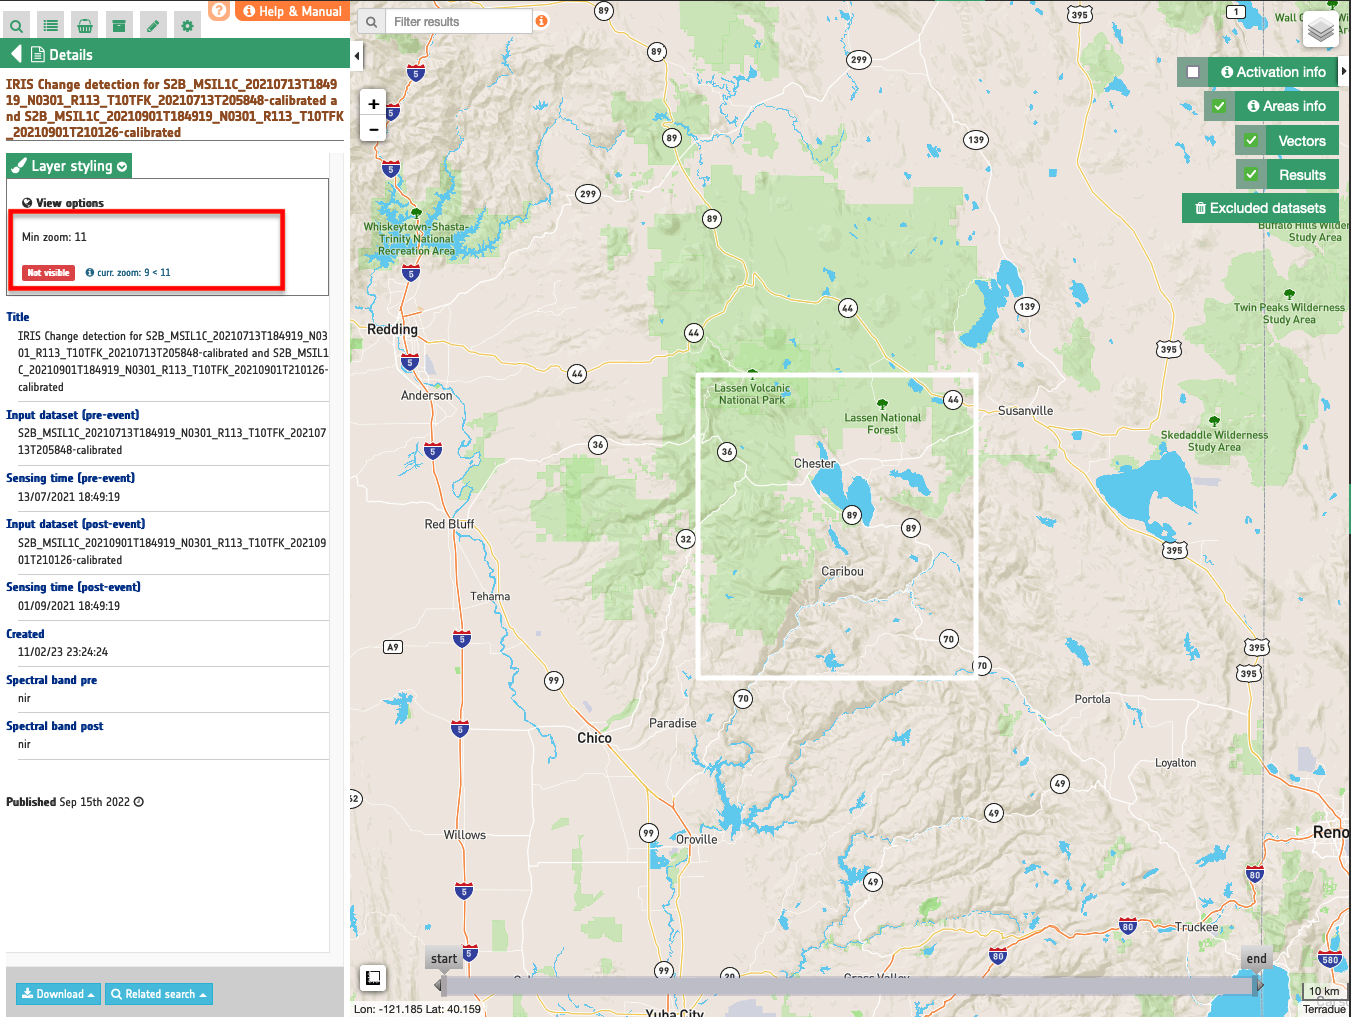
Zoom in to see polygons displayed in the map.

Download
In this first use case the FilterVectorize service offers the following products:
- vectorized: converted polygons from discrete single band asset given as vector file in GeoJSON format,
- vectorized_octet: converted polygons from discrete single band asset given as vector file in FlatGeoBuf format.
These products can be downloaded by clicking on the Download button located at the bottom of the Product Details tab in the left panel.
After the download of the vector in GeoJSON format, this file can be easily imported in GIS software (e.g. in QGIS).

Use case 2: filter noisy binary mask from a change detection service
Abstract
This second use case explains how to filter a noise binary mask derived from a change detection service (e.g. CVA or IRMAD).
Find and access a Result from other on-demand services
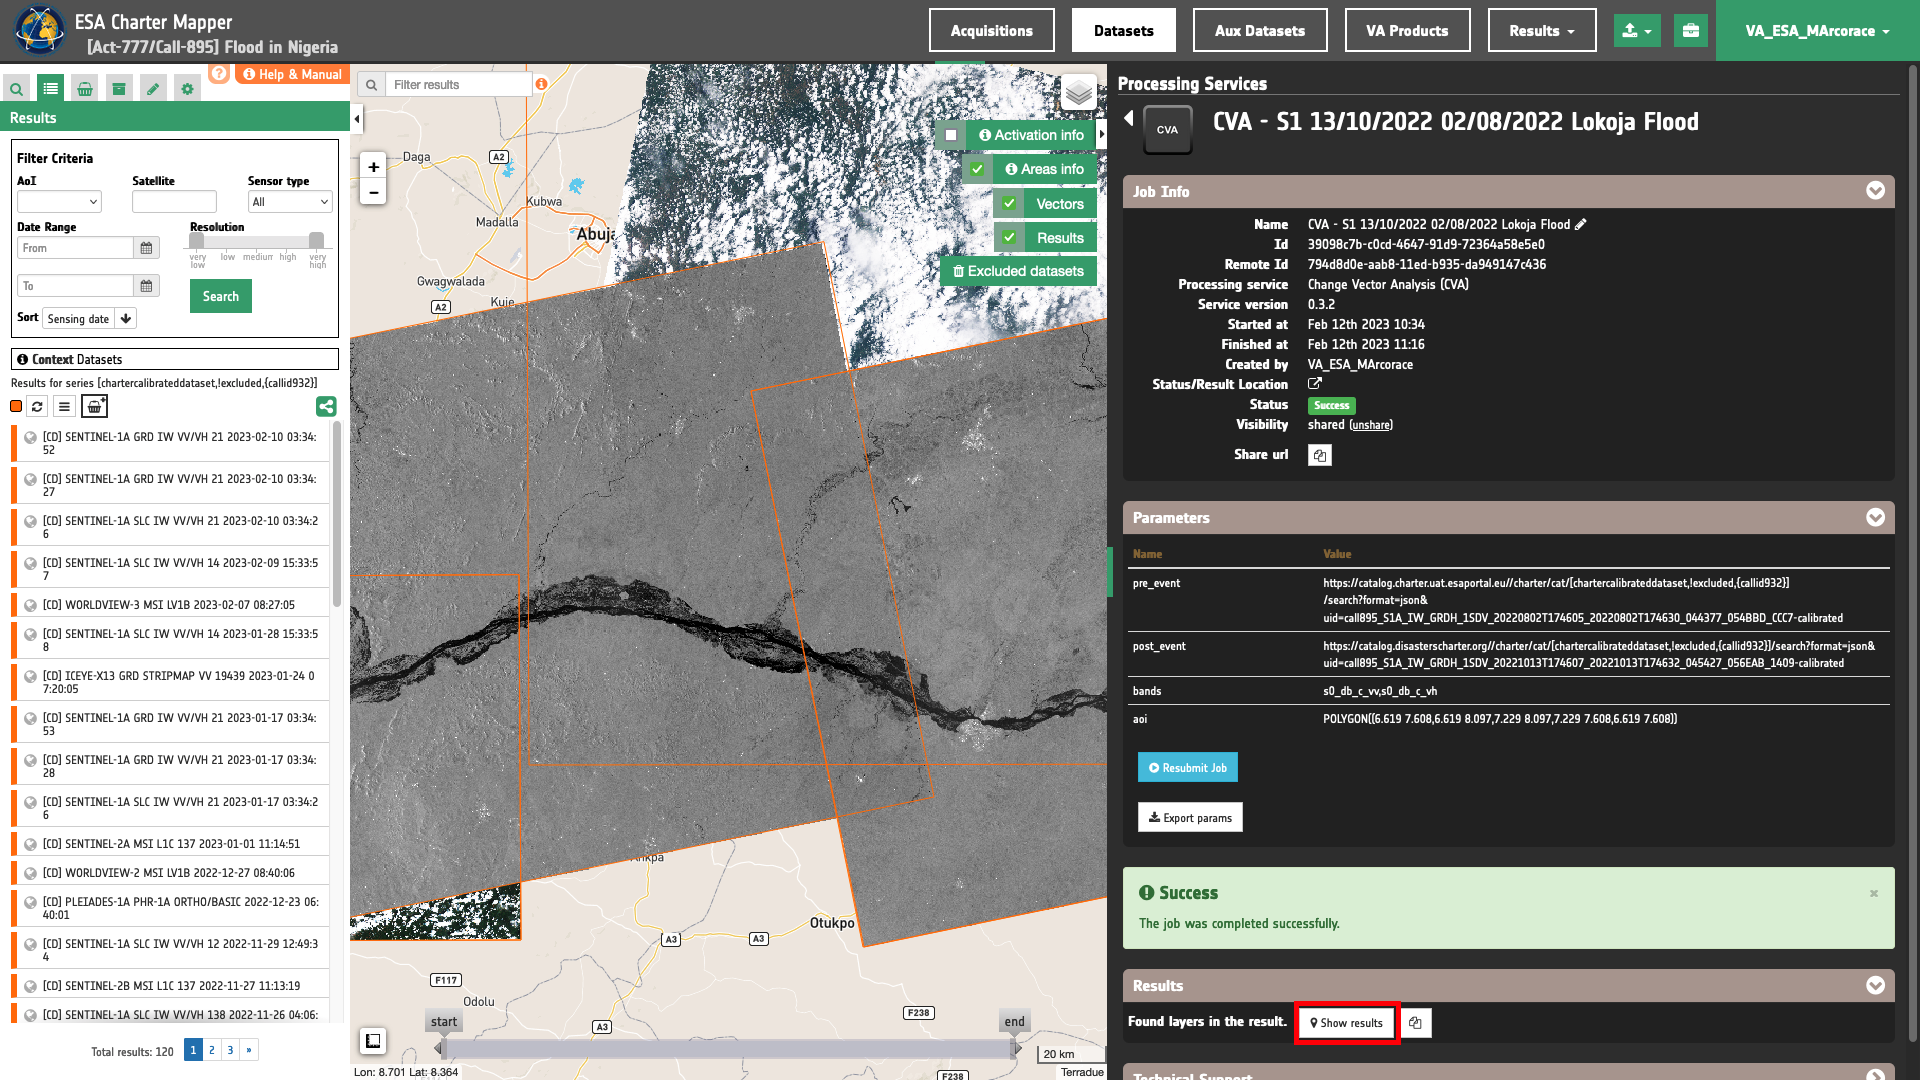
Select the area for which you want to do an analysis e.g. near Lokoja, Nigeria. In this use case a Result from the CVA service is post-processed by the FilterVectorize service to obtain a spatially filtered CVA binary change map for a flood event occurred in 2022 near Lokoja, Nigeria.
Find a successful CVA job from the Right Panel Processing Services under the Jobs tab and access to the Result in the left panel by clicking on the Show results button.
Tip
Same CVA processing result can also be listed in the left panel under the Results tab by clicking on My results or Shared results under the Results data context.
In this example the CVA Result derived from a pair of Sentinel-1 GRD Calibrated Datasets is:
CVA - S1 13/10/2022 02/08/2022 Lokoja Flood
Fill the parameters
After the identification of the input CVA Result, you can employ FilterVectorize in Filter mode, by using the binary mask of detected changes (change_vector_analysis single band asset) from the CVA Result derived with Sentinel-1 data. To do so you can fill the parameters as described in the following sections.
Job name
Insert as job name:
Filter CVA 50 pixels - S1 13/10/2022 02/08/2022 Lokoja Flood
Input discrete single-band raster
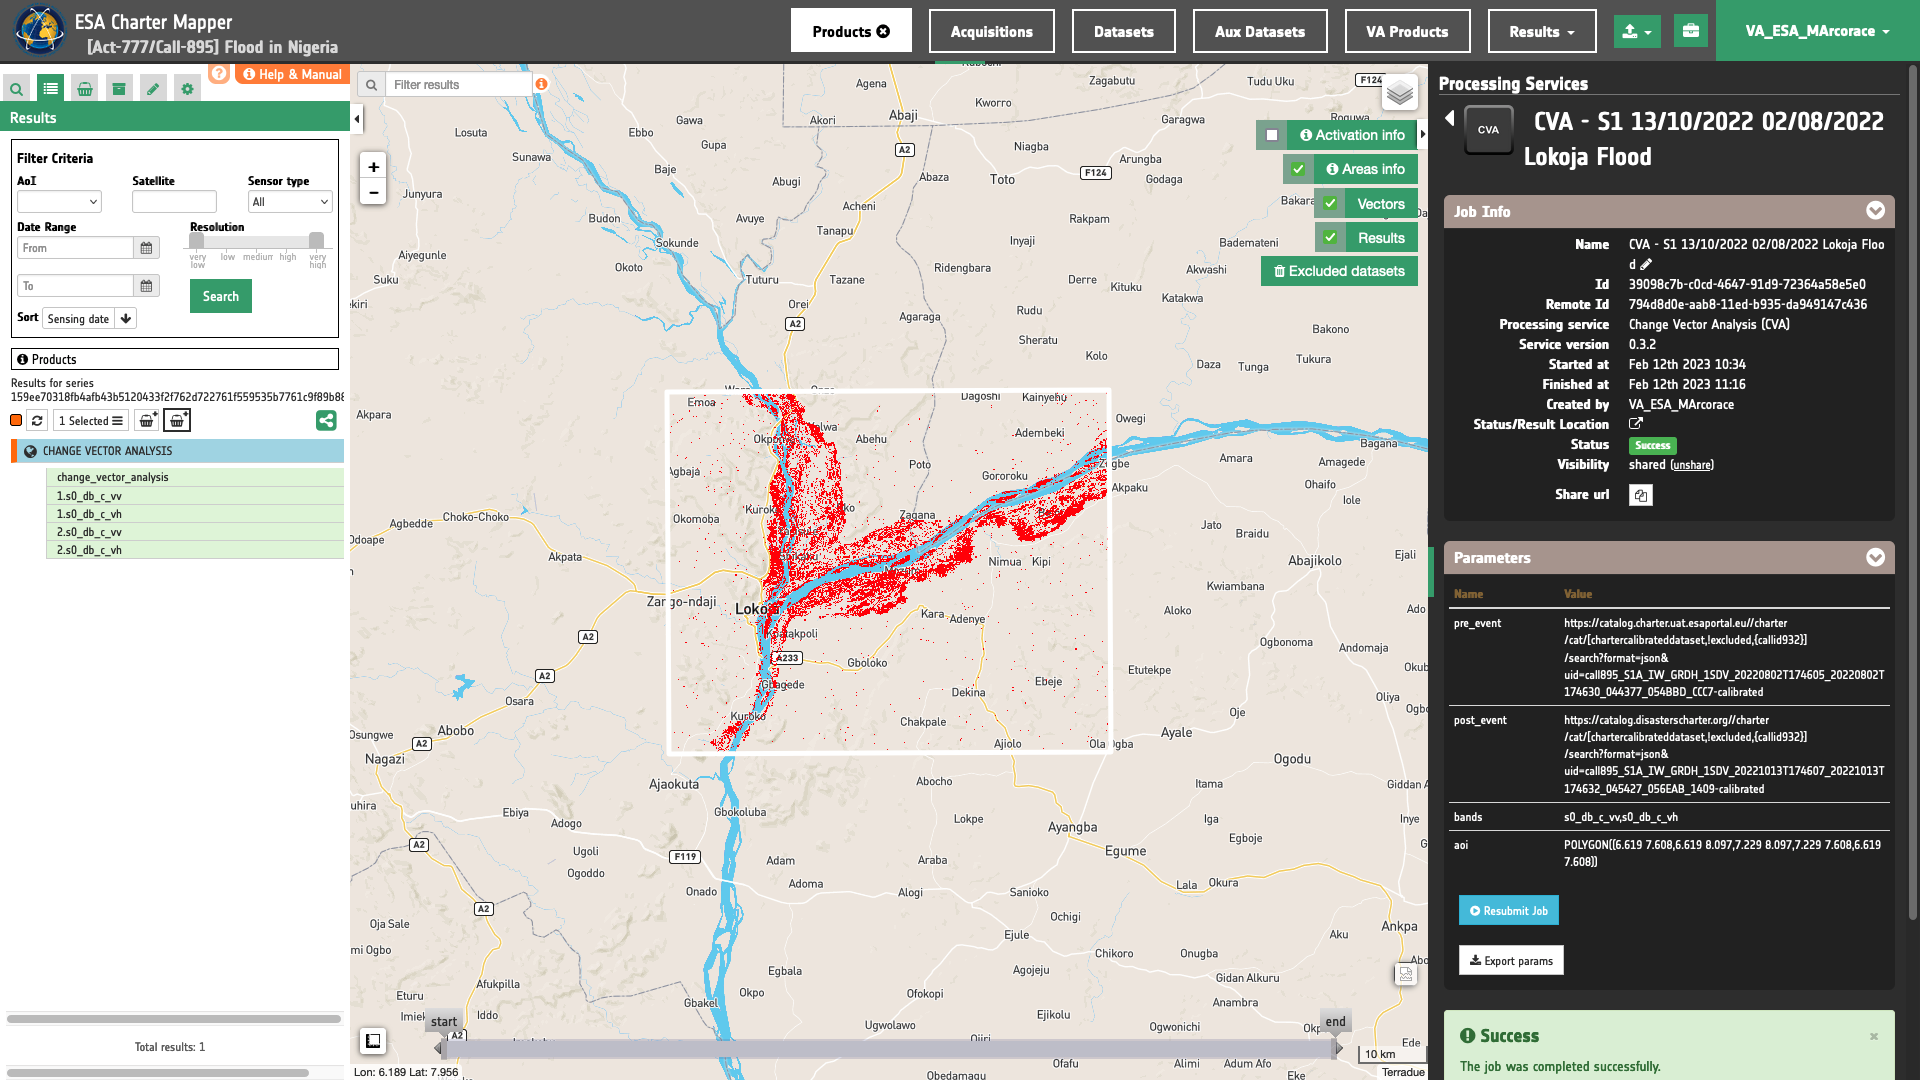
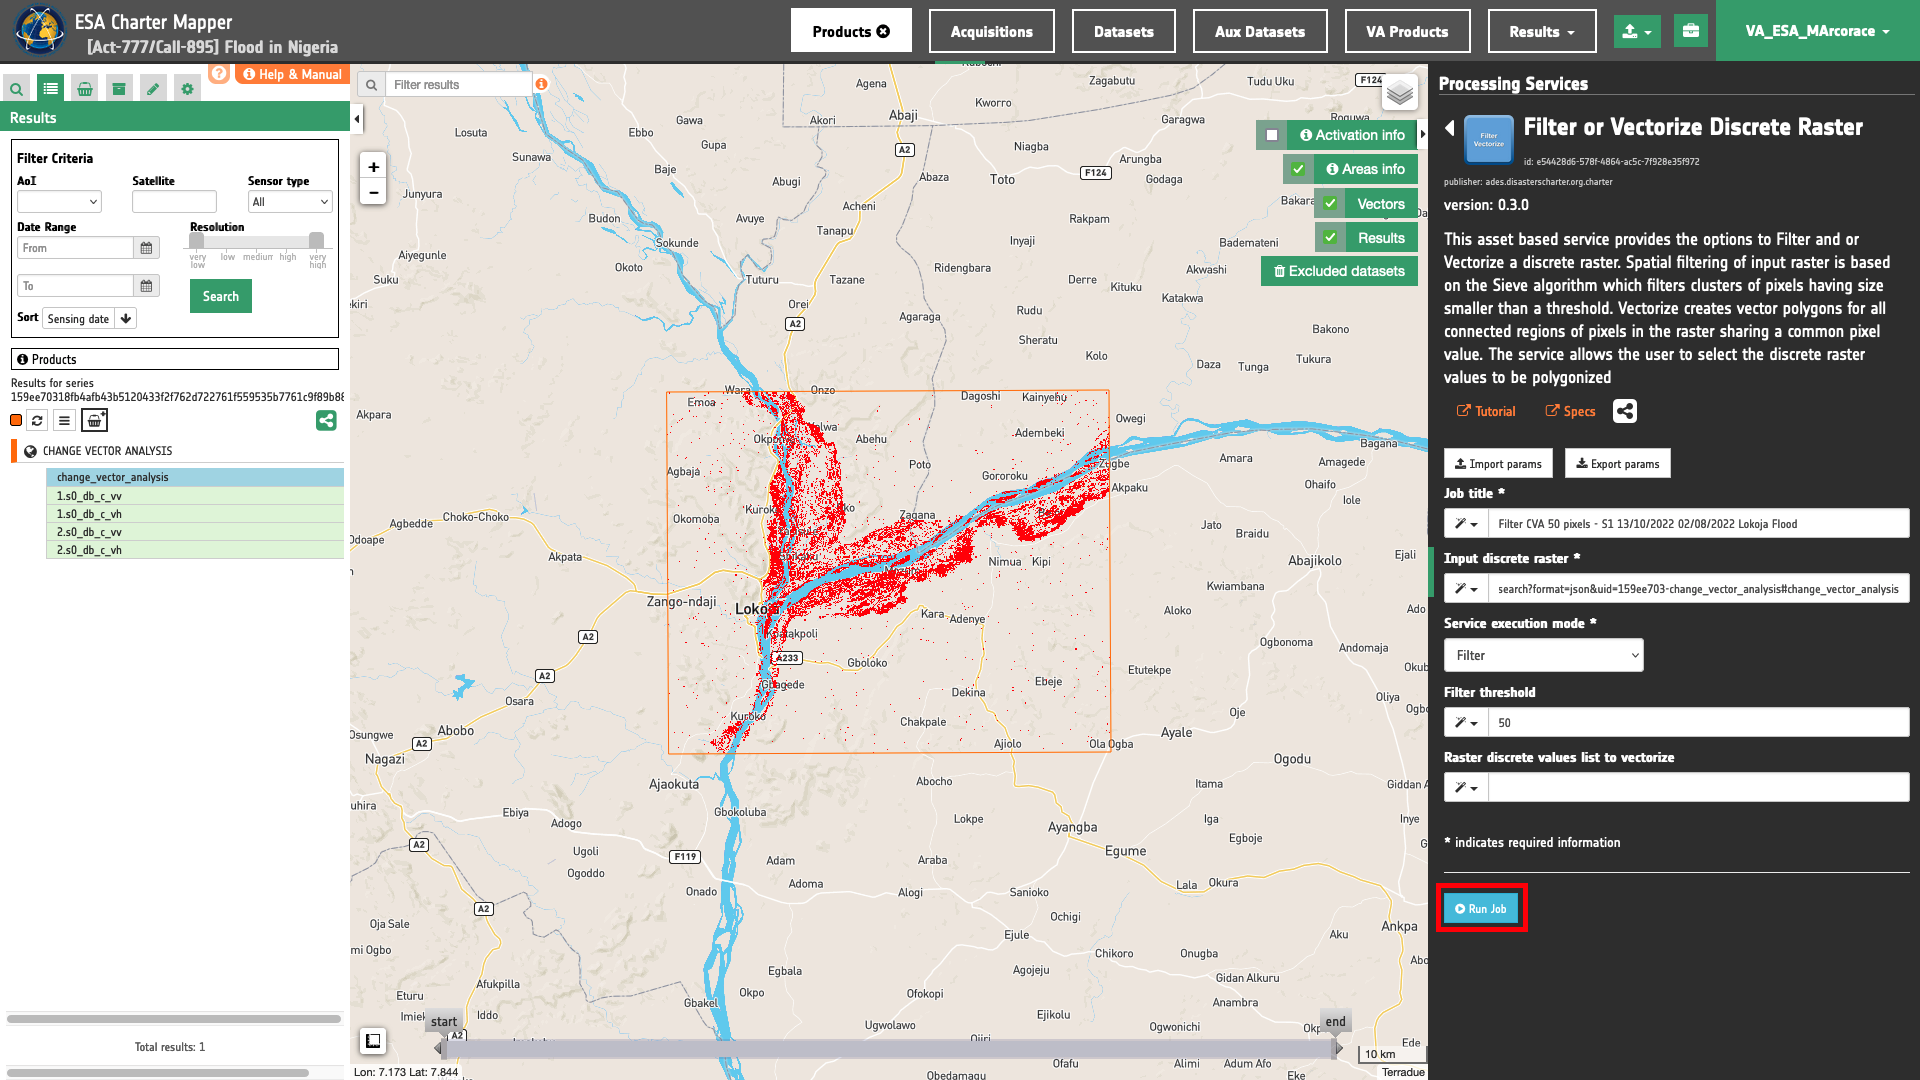
First mandatory parameter is the input product reference to a discrete single band asset from a Result of an on-demand service. This parameter is required to specify both the product reference to the Result and the discrete single band asset to be used in FilterVectorize. Thus, drag and Drop the single band asset change_vector_analysis in the Input discrete raster field.
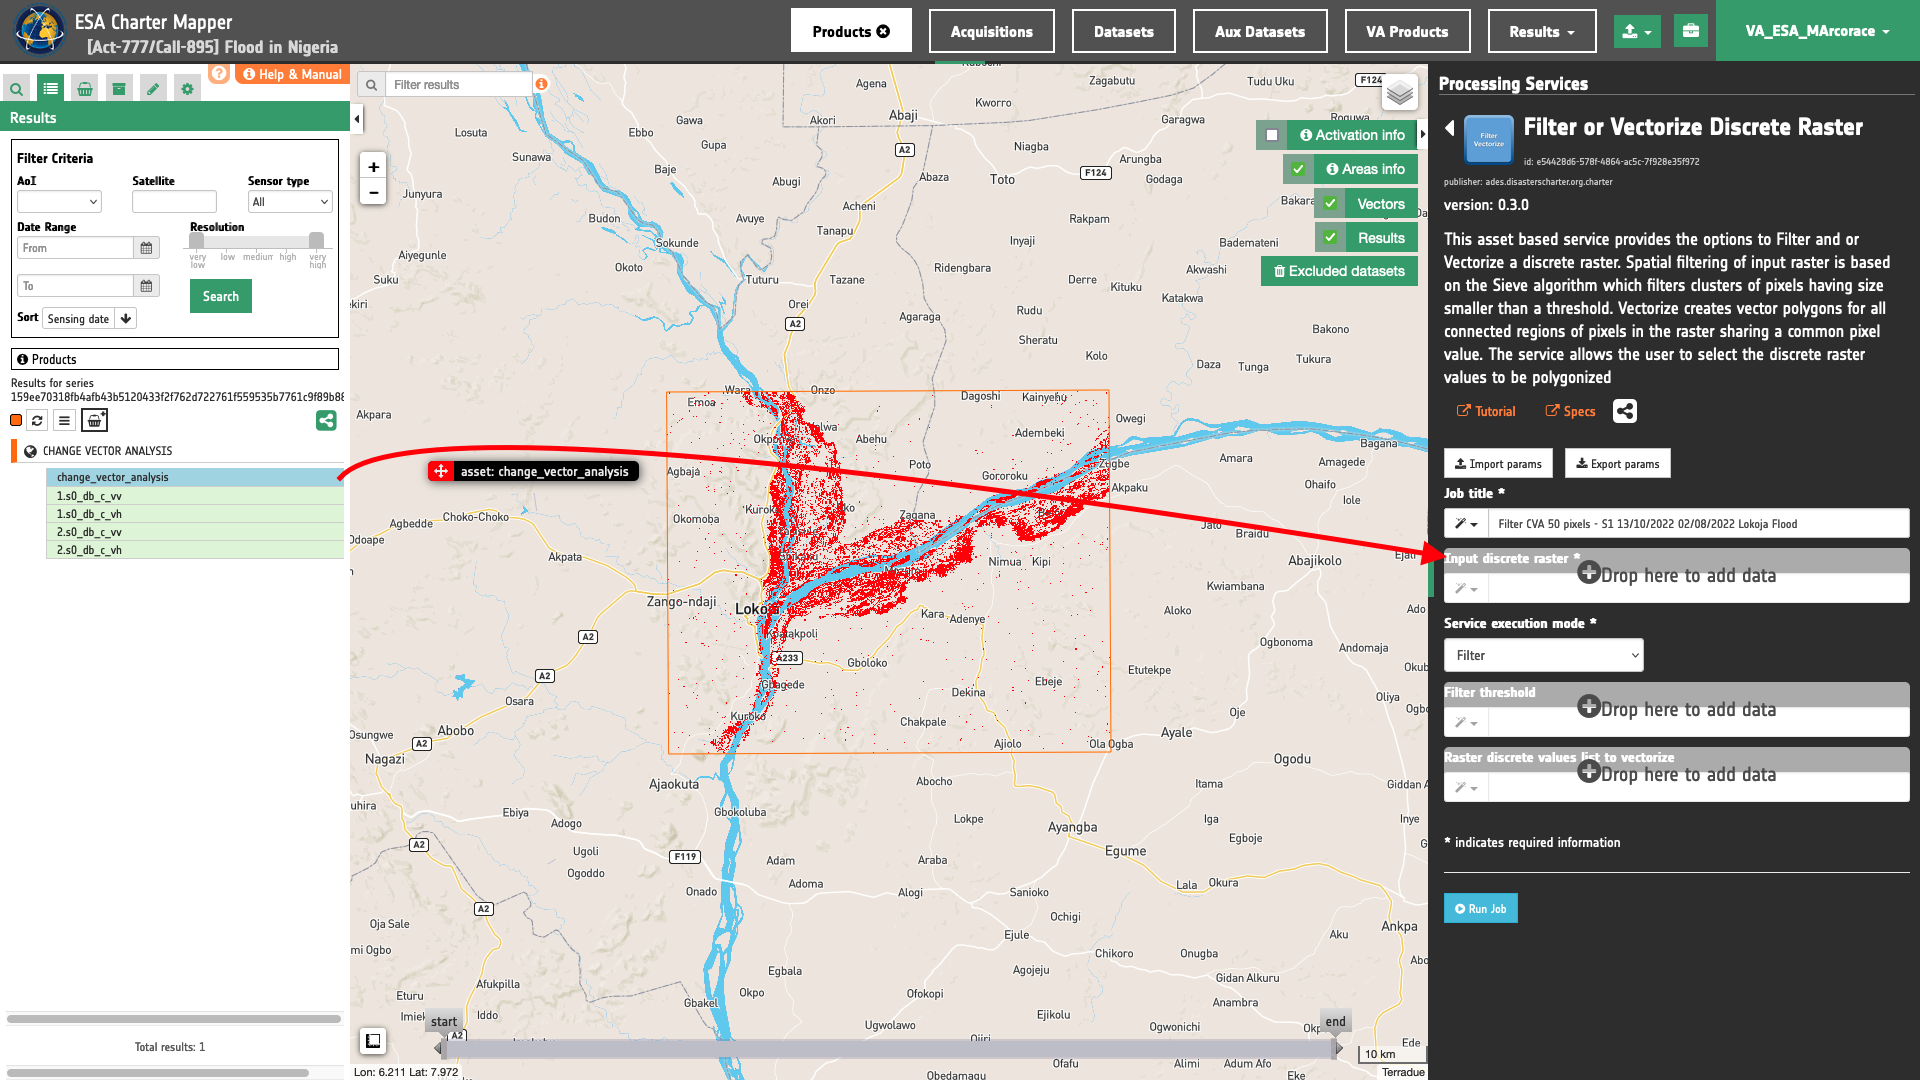
Service execution mode
Select the Filter mode from the list.
Filter Threshold
In Filter execution mode, the user shall define a threshold size in pixels to be used in the Sieve Spatial Filtering. Insert for instance 50 which means filtering clusters of pixels having size up to 50 pixels.
Note
Threshold value shall be a positive integer number.
Note
This parameter is mandatory only for FilterVectorize executed in Filter or Filter and Vectorize modes.
Raster discrete values list to vectorize (optional)
Leave it blank being not necessary parameter for the execution of FilterVectorize in Filter mode.
Run the job
Click on the button Run Job and see the Running Job. You can monitor job progress through the progress bar.
Results: download and visualization
Once the job is completed, click on the Show results button located at the bottom of the processing service panel.
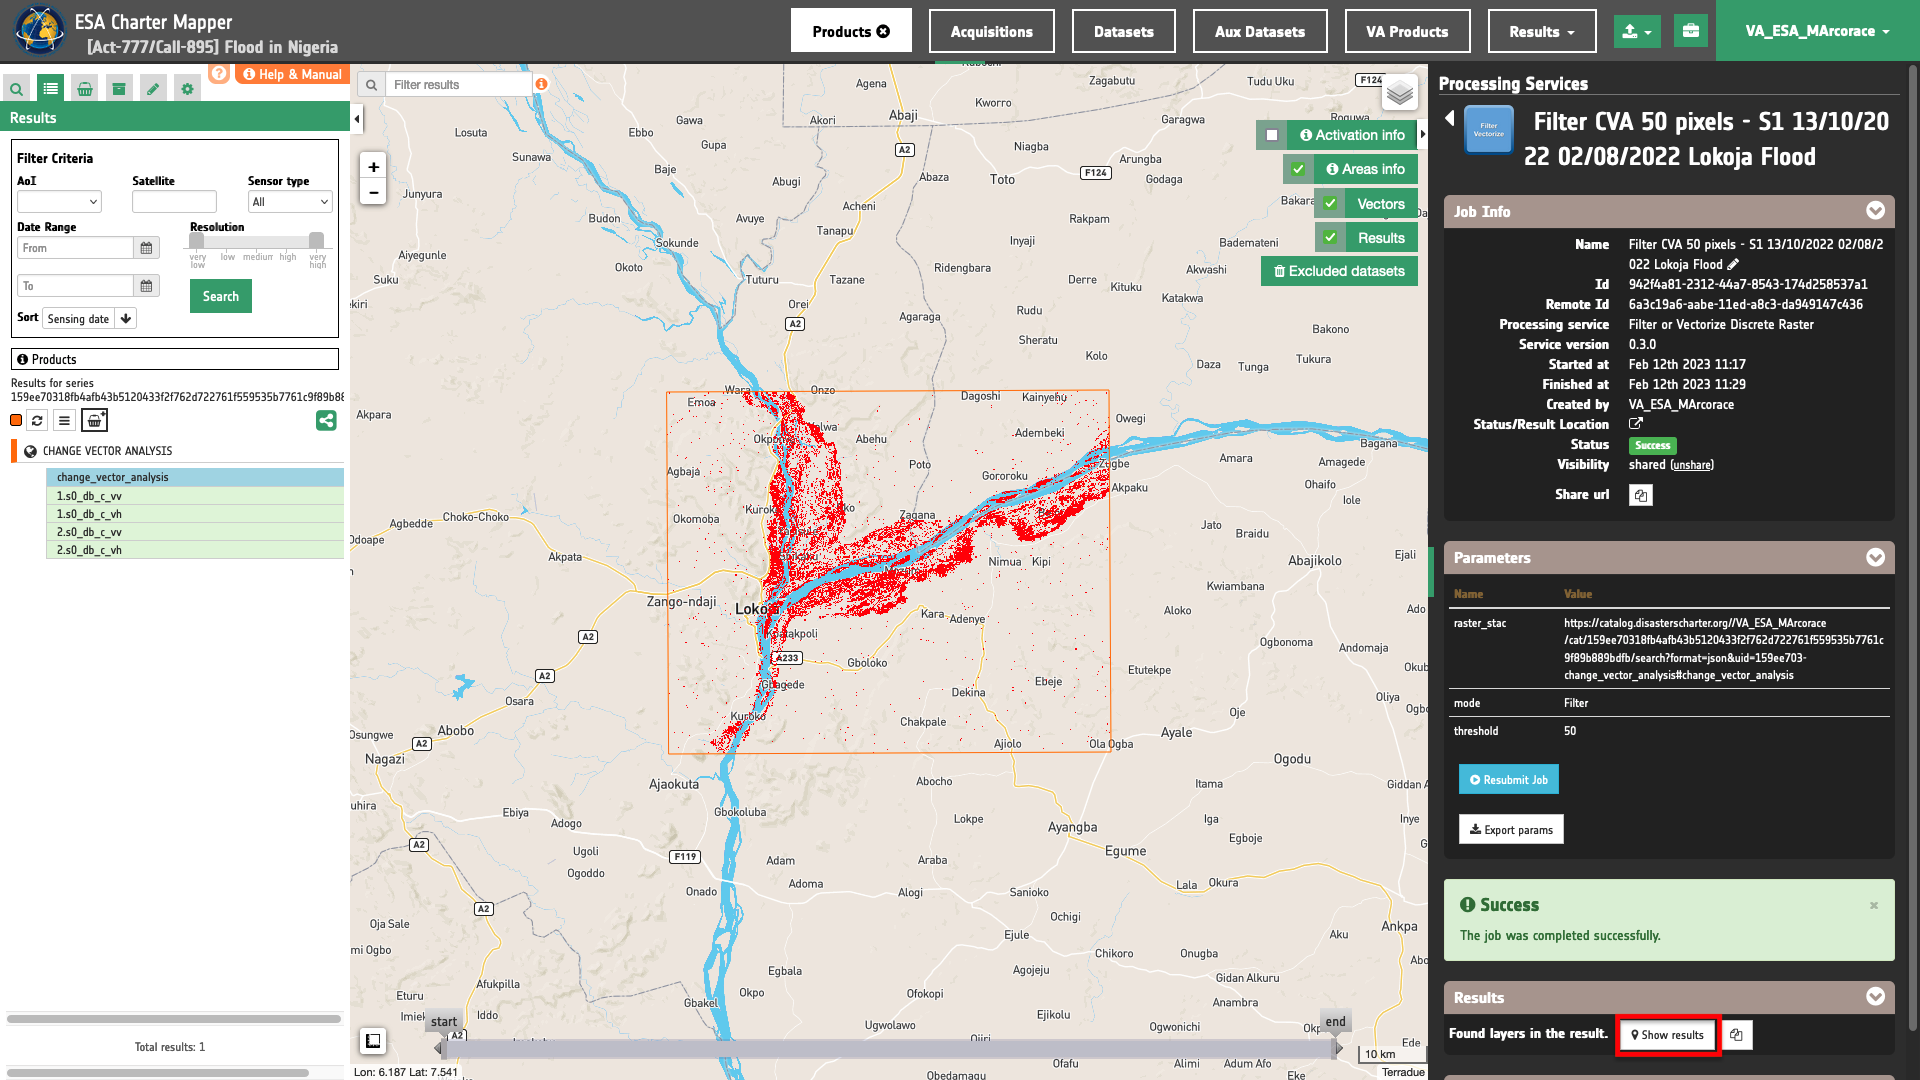
Below is reported the syntax which includes all the parameters employed in this example.
{
   "raster_stac": "https://catalog.disasterscharter.org//VA_ESA_MArcorace/cat/159ee70318fb4afb43b5120433f2f762d722761f559535b7761c9f89b889bdfb/search?format=json&uid=159ee703-change_vector_analysis#change_vector_analysis",
   "mode": "Filter",
   "threshold": "50"
}
Visualization
See the result on the map. The filtered discrete raster appears in the map.
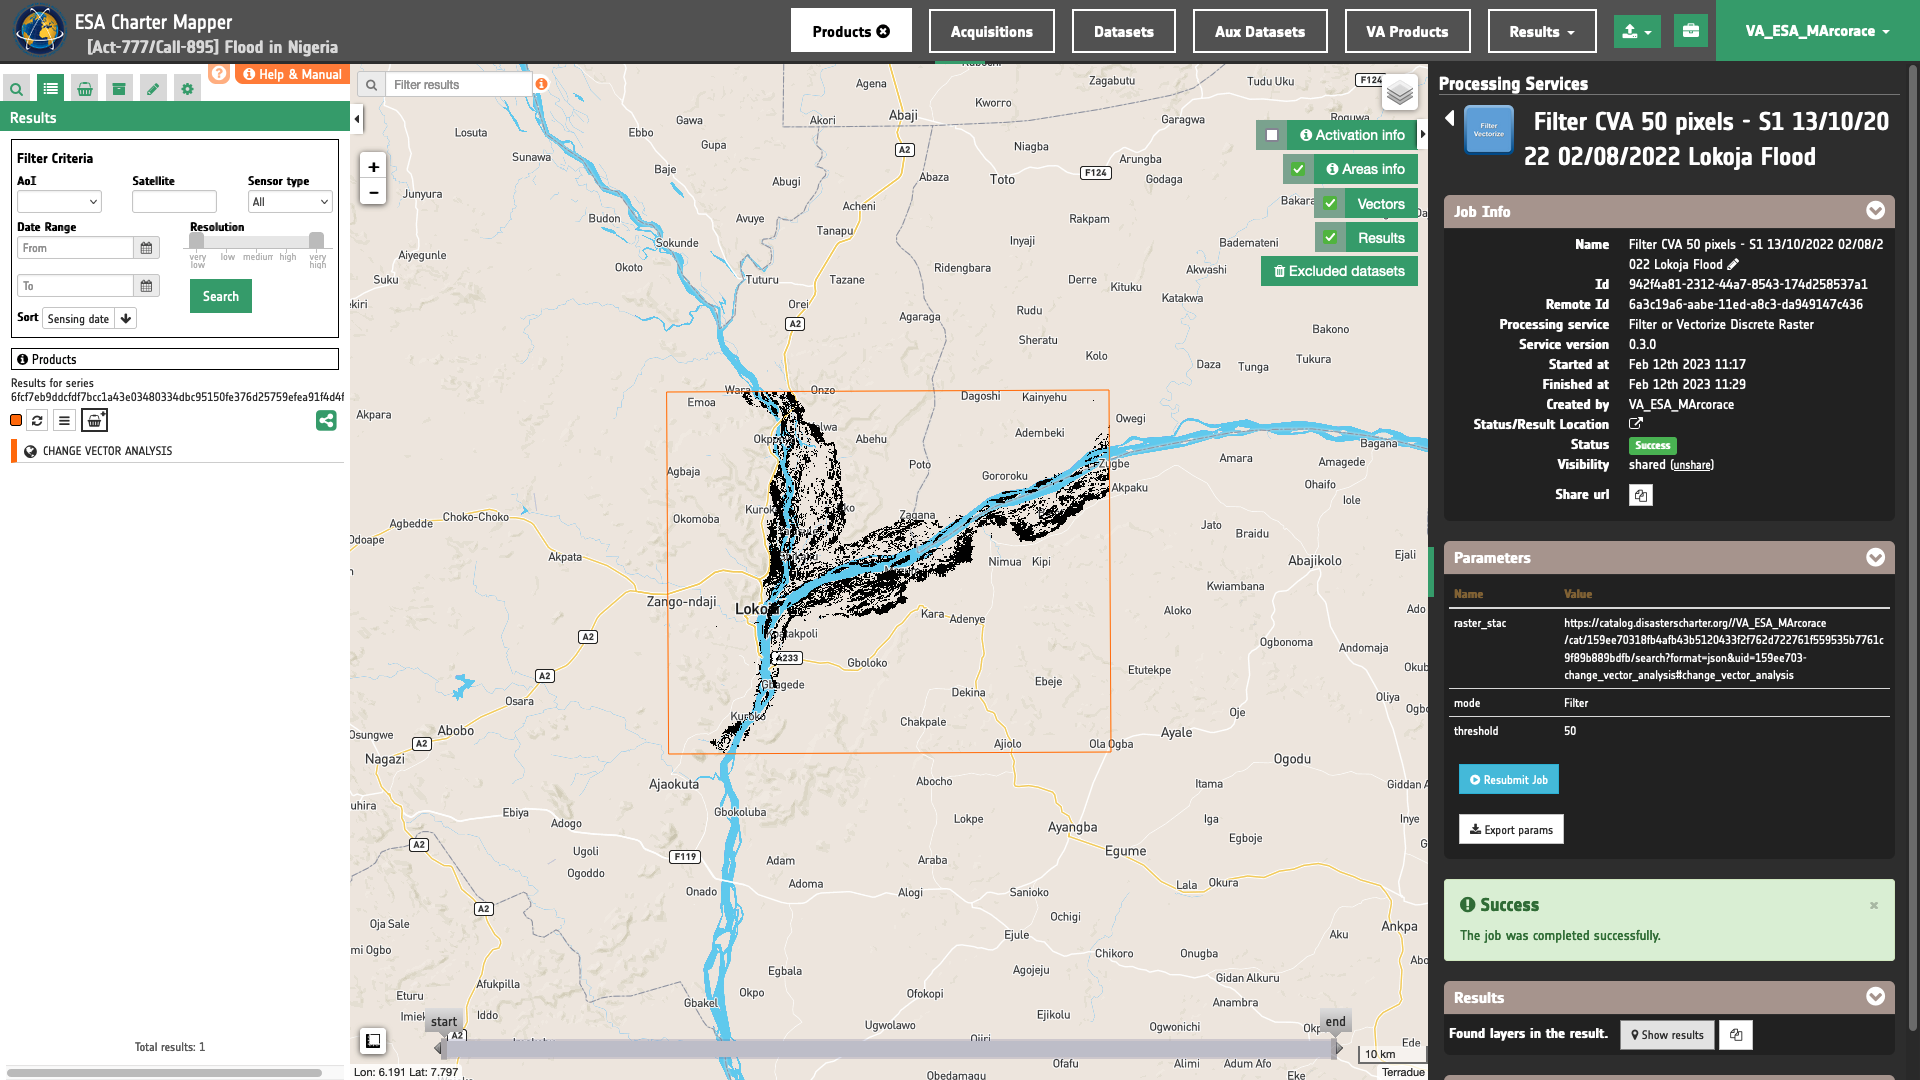
To get more information about the product just double click on the title of the vector feature listed in the left panel under the Result tab.
In the left panel of the interface, the details of Job Result will appear with Product metadata. Furthermore by clicking on Layer styling you can also access to the View options
Download
In this second use case the FilterVectorize service offers the following product:
- filtered: single band asset from spatial filtering of input discrete raster given as single band raster in COG format.
This product can be downloaded by clicking on the Download button located at the bottom of the Product Details tab in the left panel.

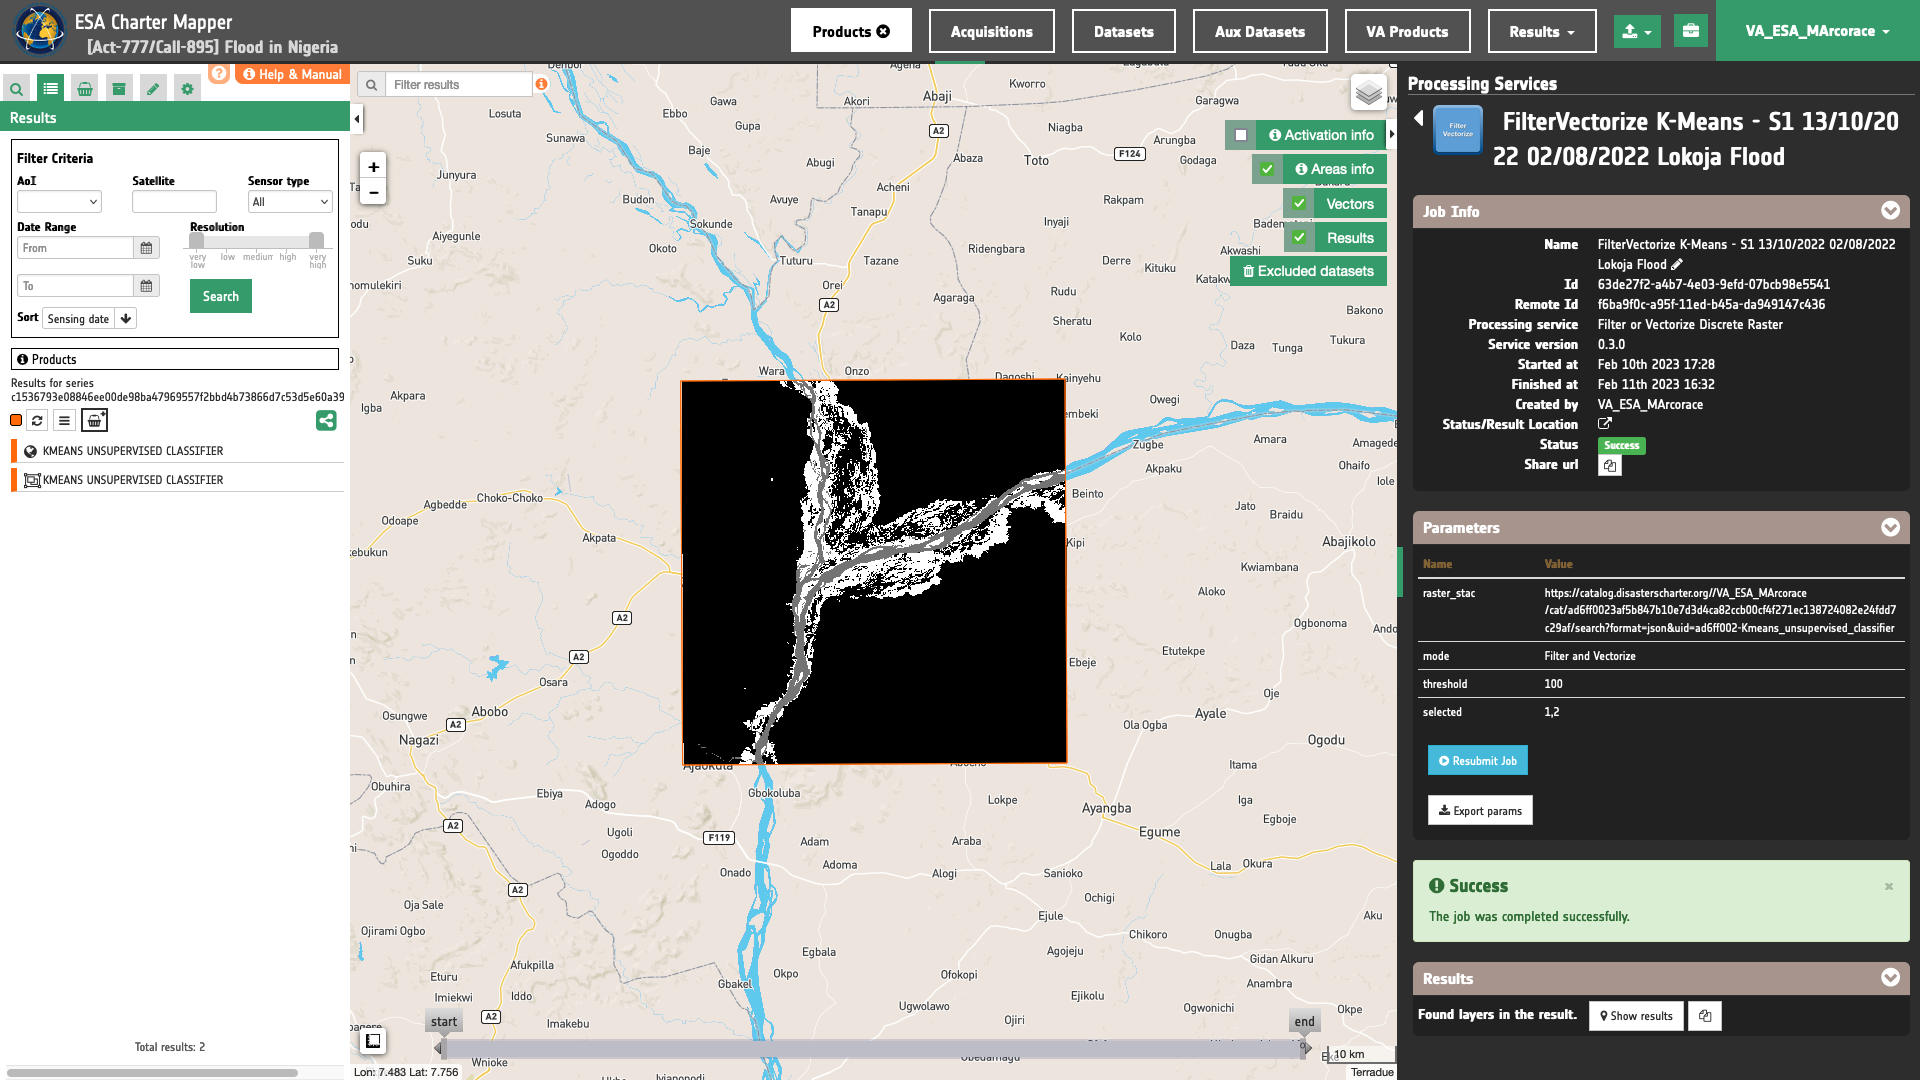
Use case 3: filter and vectorize discrete raster from unsupervised classification
Abstract
This third use case explains how to filter and vectorize a single band classification map derived from the K-Means Unsupervised classifier service.
Find and access a Result from other on-demand services
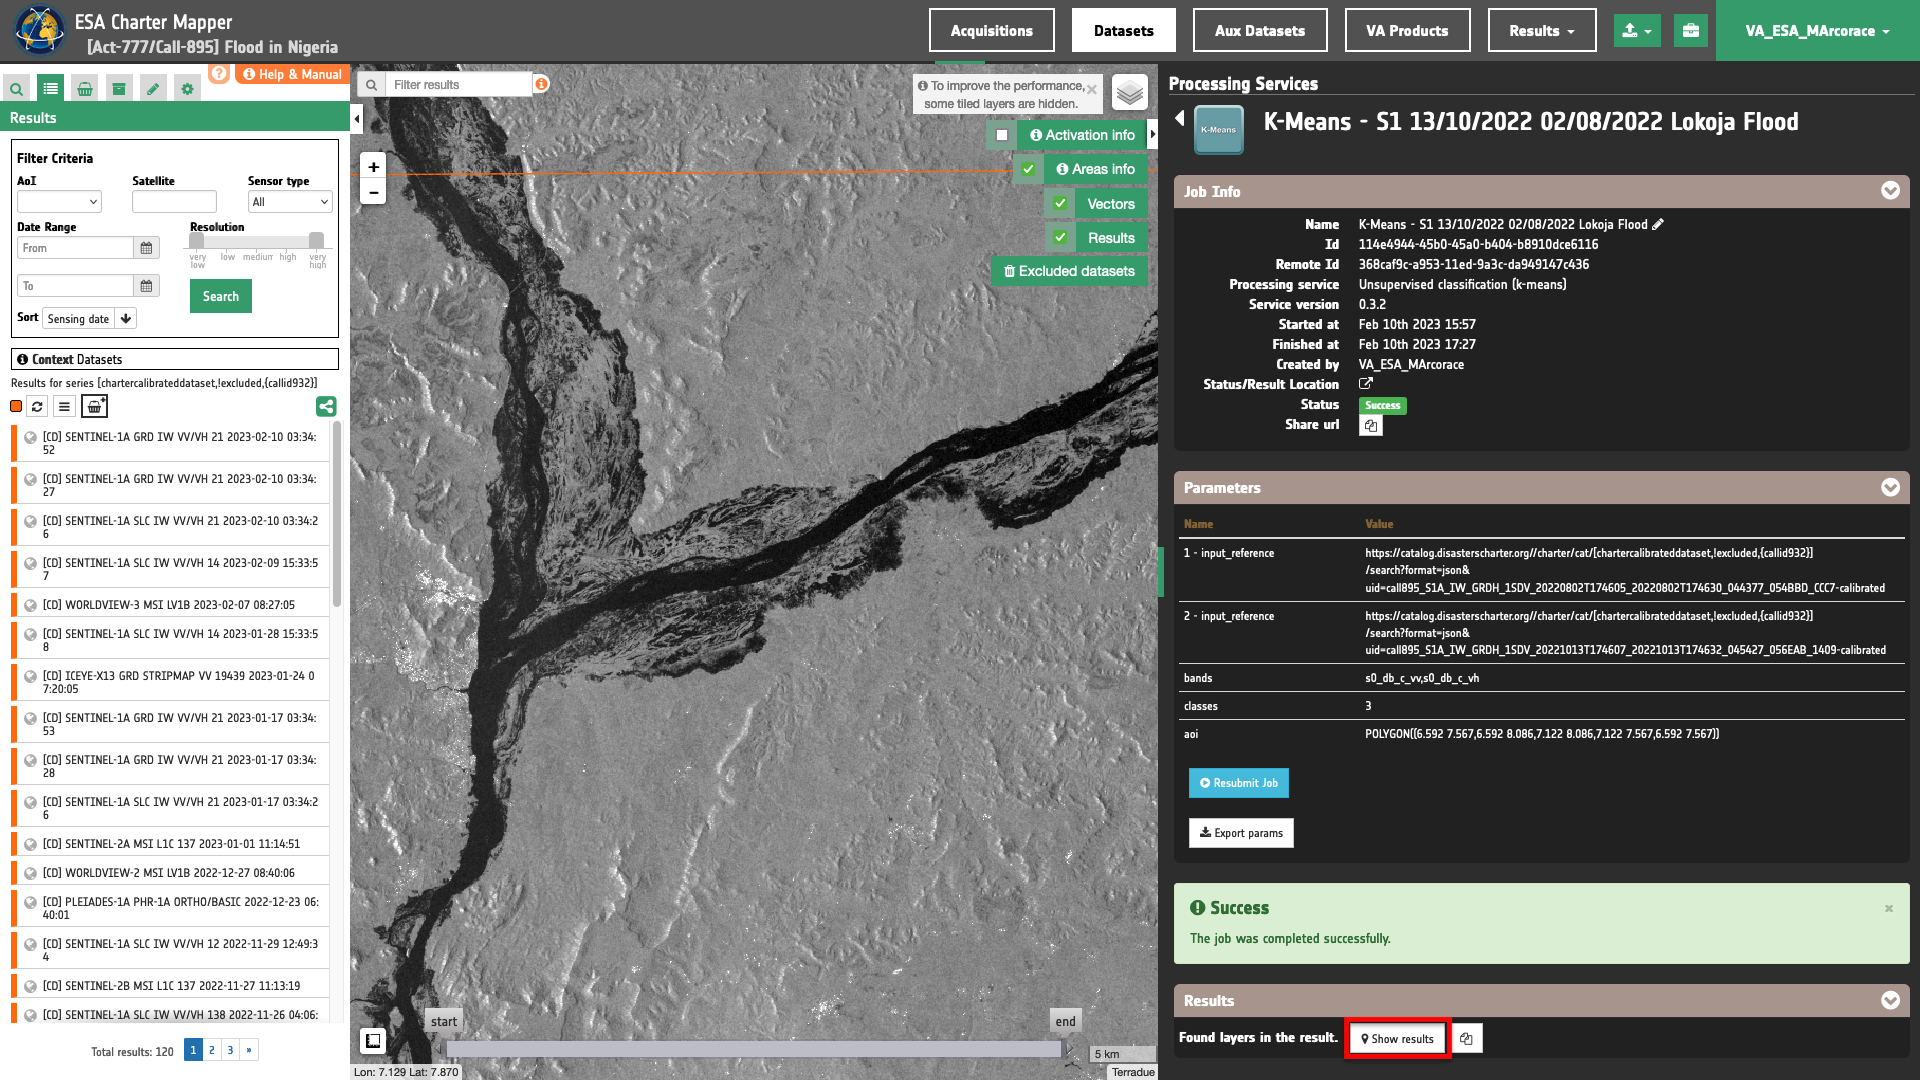
Select the area for which you want to do an analysis e.g. near Lokoja, Nigeria. In this use case a Result from the K-Means service is post-processed by the FilterVectorize service to obtain a spatially filtered unsupervised classification map and convert it to vector. K-means classification result is obtained using dual pol SAR data acquired during a flood event occurred in 2022 near Lokoja, Nigeria.
Find a successful K-Means job from the Right Panel Processing Services under the Jobs tab and access to the Result in the left panel by clicking on the Show results button.
Tip
Same K-Means processing result can also be listed in the left panel under the Results tab by clicking on My results or Shared results under the Results data context.
In this example the K-Means Result derived from a pair of Sentinel-1 GRD Calibrated Datasets is:
K-Means - S1 13/10/2022 02/08/2022 Lokoja Flood
Fill the parameters
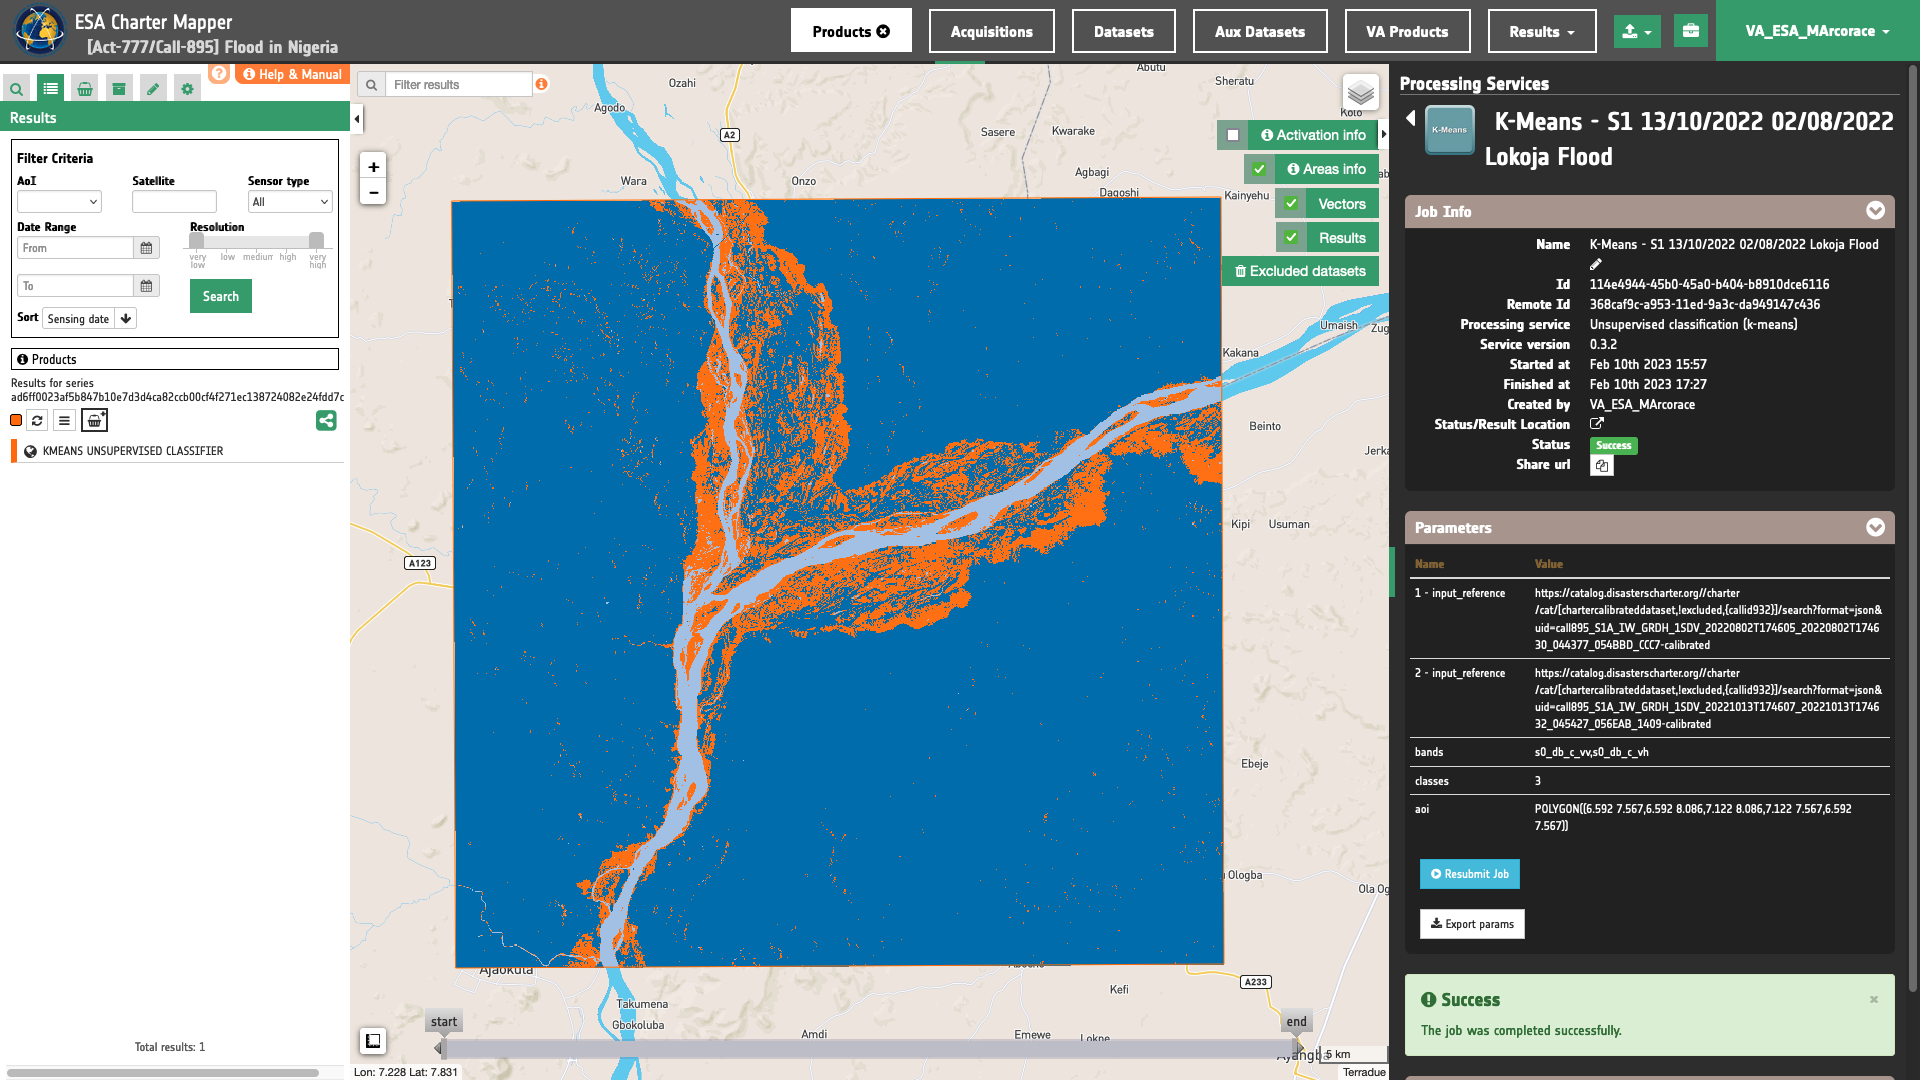
After the identification of the input K-Means Result, you can employ FilterVectorize in Filter and Vectorize mode, by using the binary mask of detected changes (Kmeans_unsupervised_classifier single band asset) from the K-Means Result derived with Sentinel-1 data. To do so you can fill the parameters as described in the following sections.
Job name
Insert as job name:
FilterVectorize K-Means - S1 13/10/2022 02/08/2022 Lokoja Flood
Input discrete single-band raster
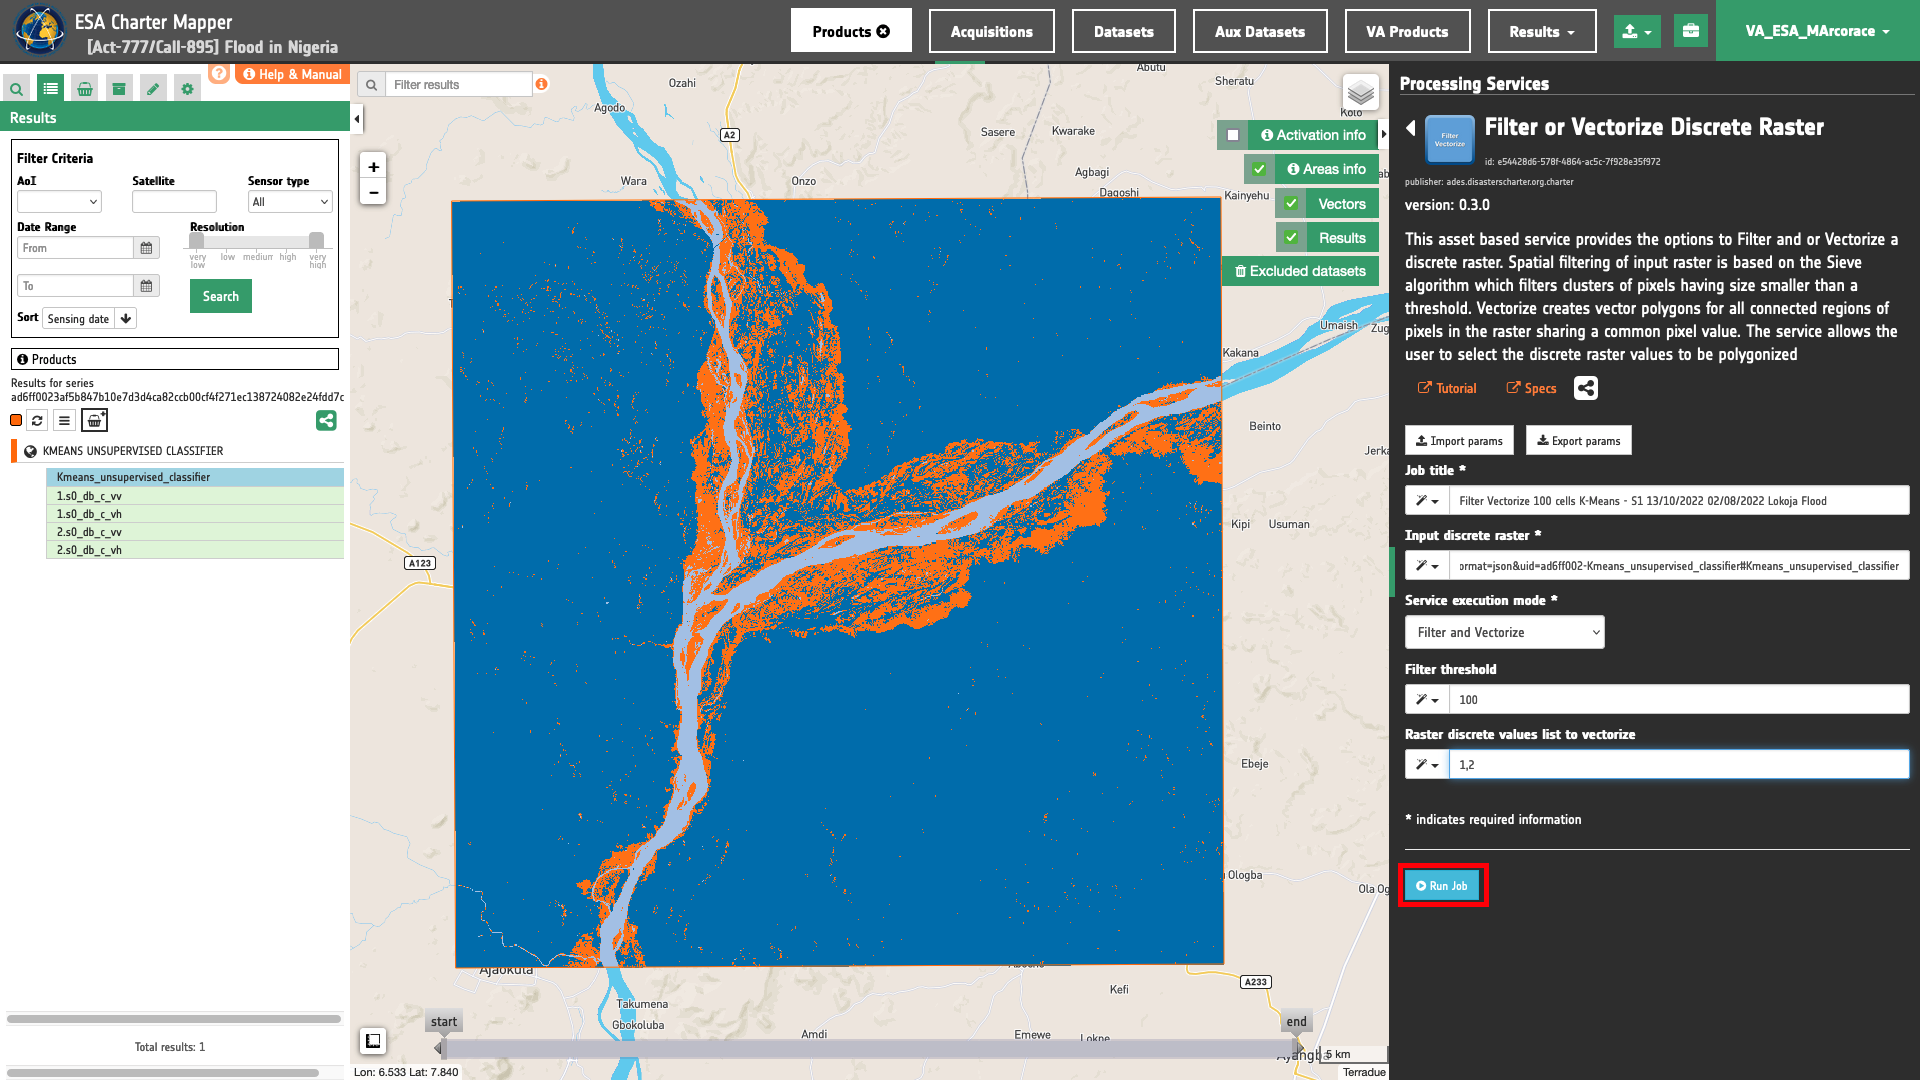
First mandatory parameter is the input product reference to a discrete single band asset from a Result of an on-demand service. This parameter is required to specify both the product reference to the Result and the discrete single band asset to be used in FilterVectorize. Thus, drag and Drop the single band asset Kmeans_unsupervised_classifier in the Input discrete raster field.
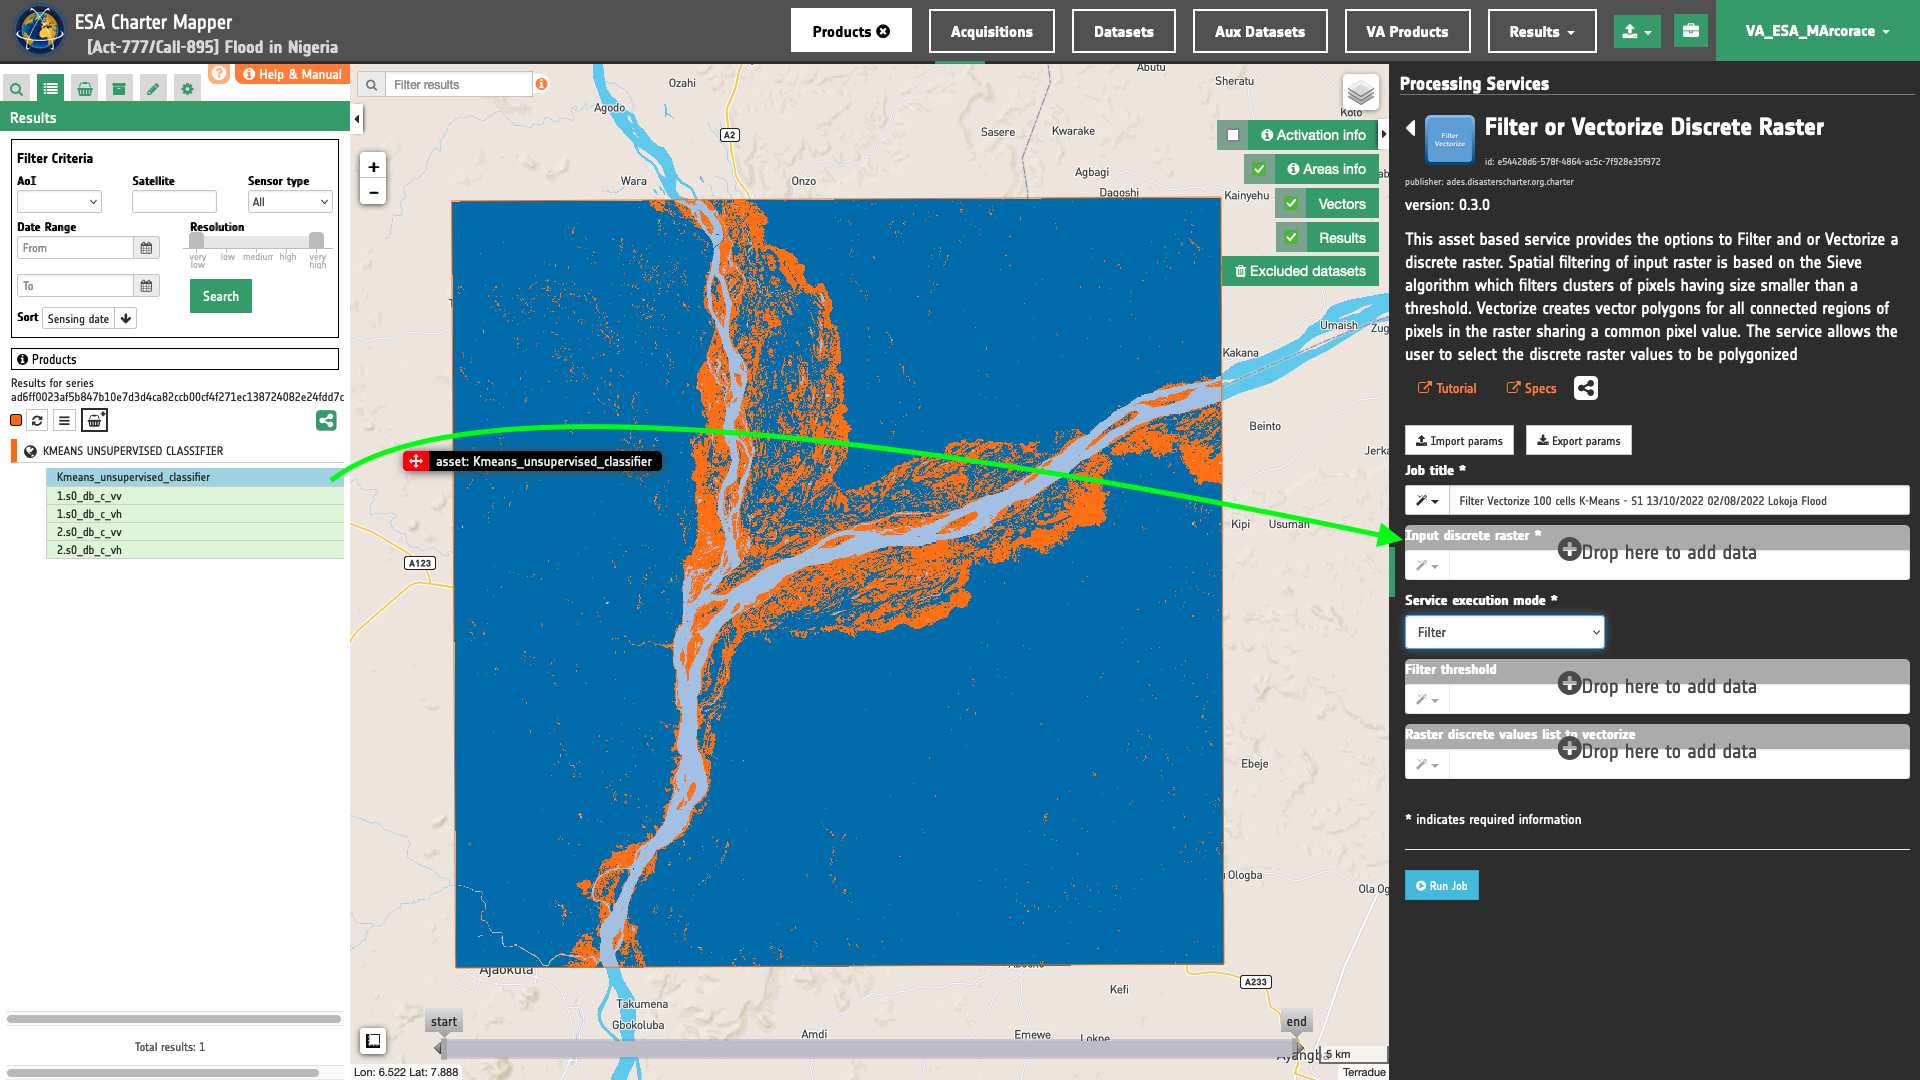
Service execution mode
Select the Filter and Vectorize mode from the list.
Filter Threshold
In Filter and Vectorize execution mode, the user shall define a threshold size in pixels to be used in the Sieve Spatial Filtering. Insert for instance 100 which means filtering clusters of pixels having size up to 100 pixels.
Note
Threshold value shall be a positive integer number.
Note
This parameter is mandatory only for FilterVectorize executed in Filter or Filter and Vectorize modes.
Raster discrete values list to vectorize (optional)
In this last optional parameter the user can insert a single (e.g. 1) or a list (1,2) of DN values to vectorize. Inserted pixel value/s of input raster will be used when converting the Kmeans_unsupervised_classifier discrete raster into polygons.
Hint
Find here more details about the Kmeans_unsupervised_classifier asset from K-means service.
Insert 1,2 to have only pixels representing K-means classes 2 and 3 converted to polygons.
Note
When this parameter is left blank in Vectorize or Filter and Vectorize modes, all DNs of input discrete rasters are converted to polygons (e.g. all classes for Kmeans_unsupervised_classifier asset).
Run the job
Click on the button Run Job and see the Running Job. You can monitor job progress through the progress bar.
Results: download and visualization
Once the job is completed, click on the Show results button located at the bottom of the processing service panel.
Below is reported the syntax which includes all the parameters employed in this example.
{
   "raster_stac": "https://catalog.disasterscharter.org//VA_ESA_MArcorace/cat/ad6ff0023af5b847b10e7d3d4ca82ccb00cf4f271ec138724082e24fdd7c29af/search?format=json&uid=ad6ff002-Kmeans_unsupervised_classifier#Kmeans_unsupervised_classifier",
   "mode": "Filter and Vectorize",
   "threshold": "100",
   "selected": "1,2"
}
Visualization
See the result on the map. The filtered discrete raster appears in the map.
To get more information about the product just double click on the title of the vector feature listed in the left panel under the Result tab.
In the left panel of the interface, the details of Job Result will appear with Product metadata. Furthermore by clicking on Layer styling you can also access to the View options and customize display of single band asset in the map. As an example under Select Assets you can select the asset filtered band and apply the color map Viridis. Concerning instead the vector product, information about current zoom and minimum zoom level will appear in the left panel.
Warning
Until current zoom level is higher than the minimum the vector will not be visible in the map.
Zoom in to see polygons displayed in the map.
Filtered discrete raster
Converted vector
Download
In this second use case the FilterVectorize service offers the following products:
- filtered: single band asset from spatial filtering of input discrete raster given as single band raster in COG format,
- vectorized: converted polygons from discrete single band asset given as vector file in GeoJSON format,
- vectorized_octet: converted polygons from discrete single band asset given as vector file in FlatGeoBuf format.
This product can be downloaded by clicking on the Download button located at the bottom of the Product Details tab in the left panel.